

How To Change Background Color With A Calculated Field In Tableau
At that place are many needs for conditionally formatting numbers in Tableau. I've previously covered how to dynamically change the prefix and suffix of selected measures, how to automatically change number units (i.eastward. Chiliad, M, B), and how to brandish varying decimal places dependent on value size.
This mail consolidates some of this thinking and shares iii of the most common tactics for conditionally formatting numbers in Tableau. You'll acquire how to use Tableau's existing formatting capabilities to quickly display alt code characters and emojis for unlike types of changes, how to conditionally command the size and color of text, and how to utilise dissimilar number formatting based on a parameter selection.
Related video tutorial:
Premier Tableau eLearning with Playfair+
How to use alt lawmaking characters to conditionally format iii different outcomes
For the first instance, we volition apply Tableau's default formatting capabilities to display a character of our choosing when the upshot is positive, a 2nd character when the upshot is negative, and a third character when an effect cannot exist computed (or is Zippo).
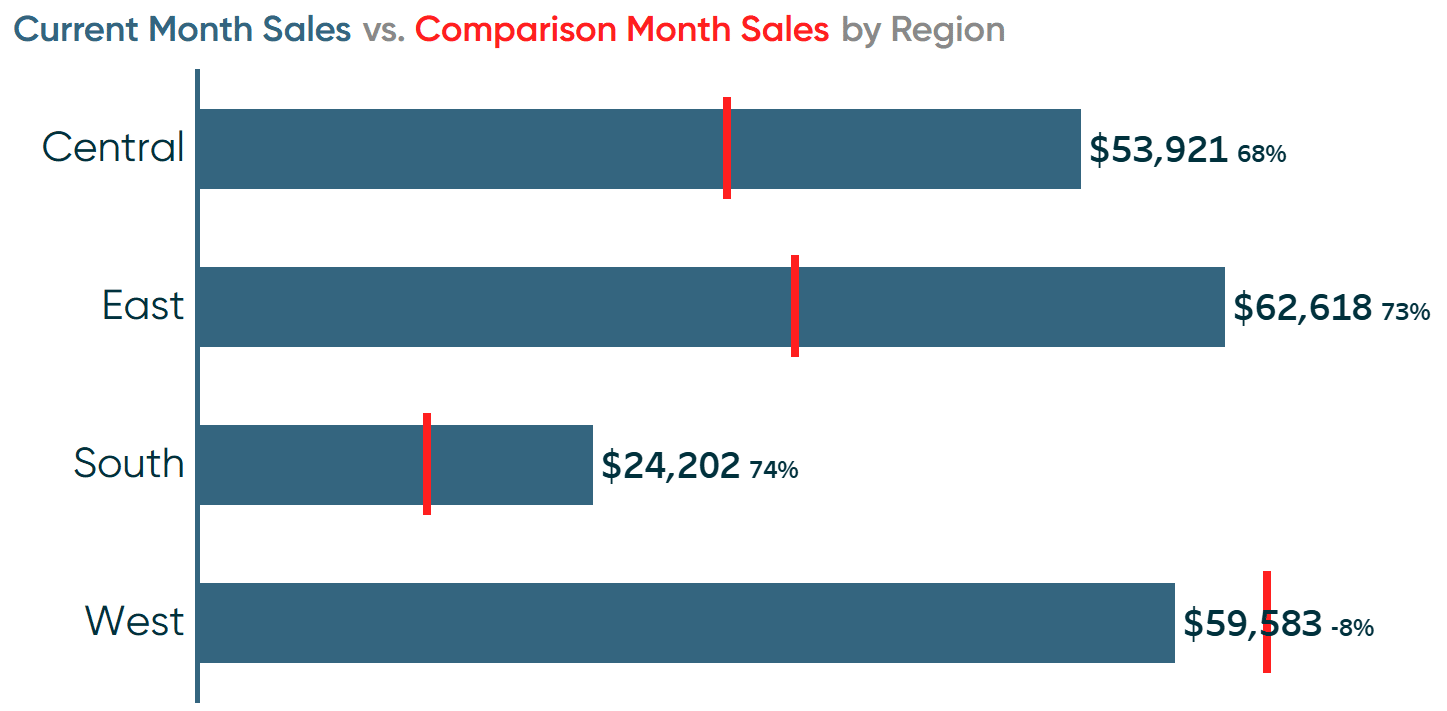
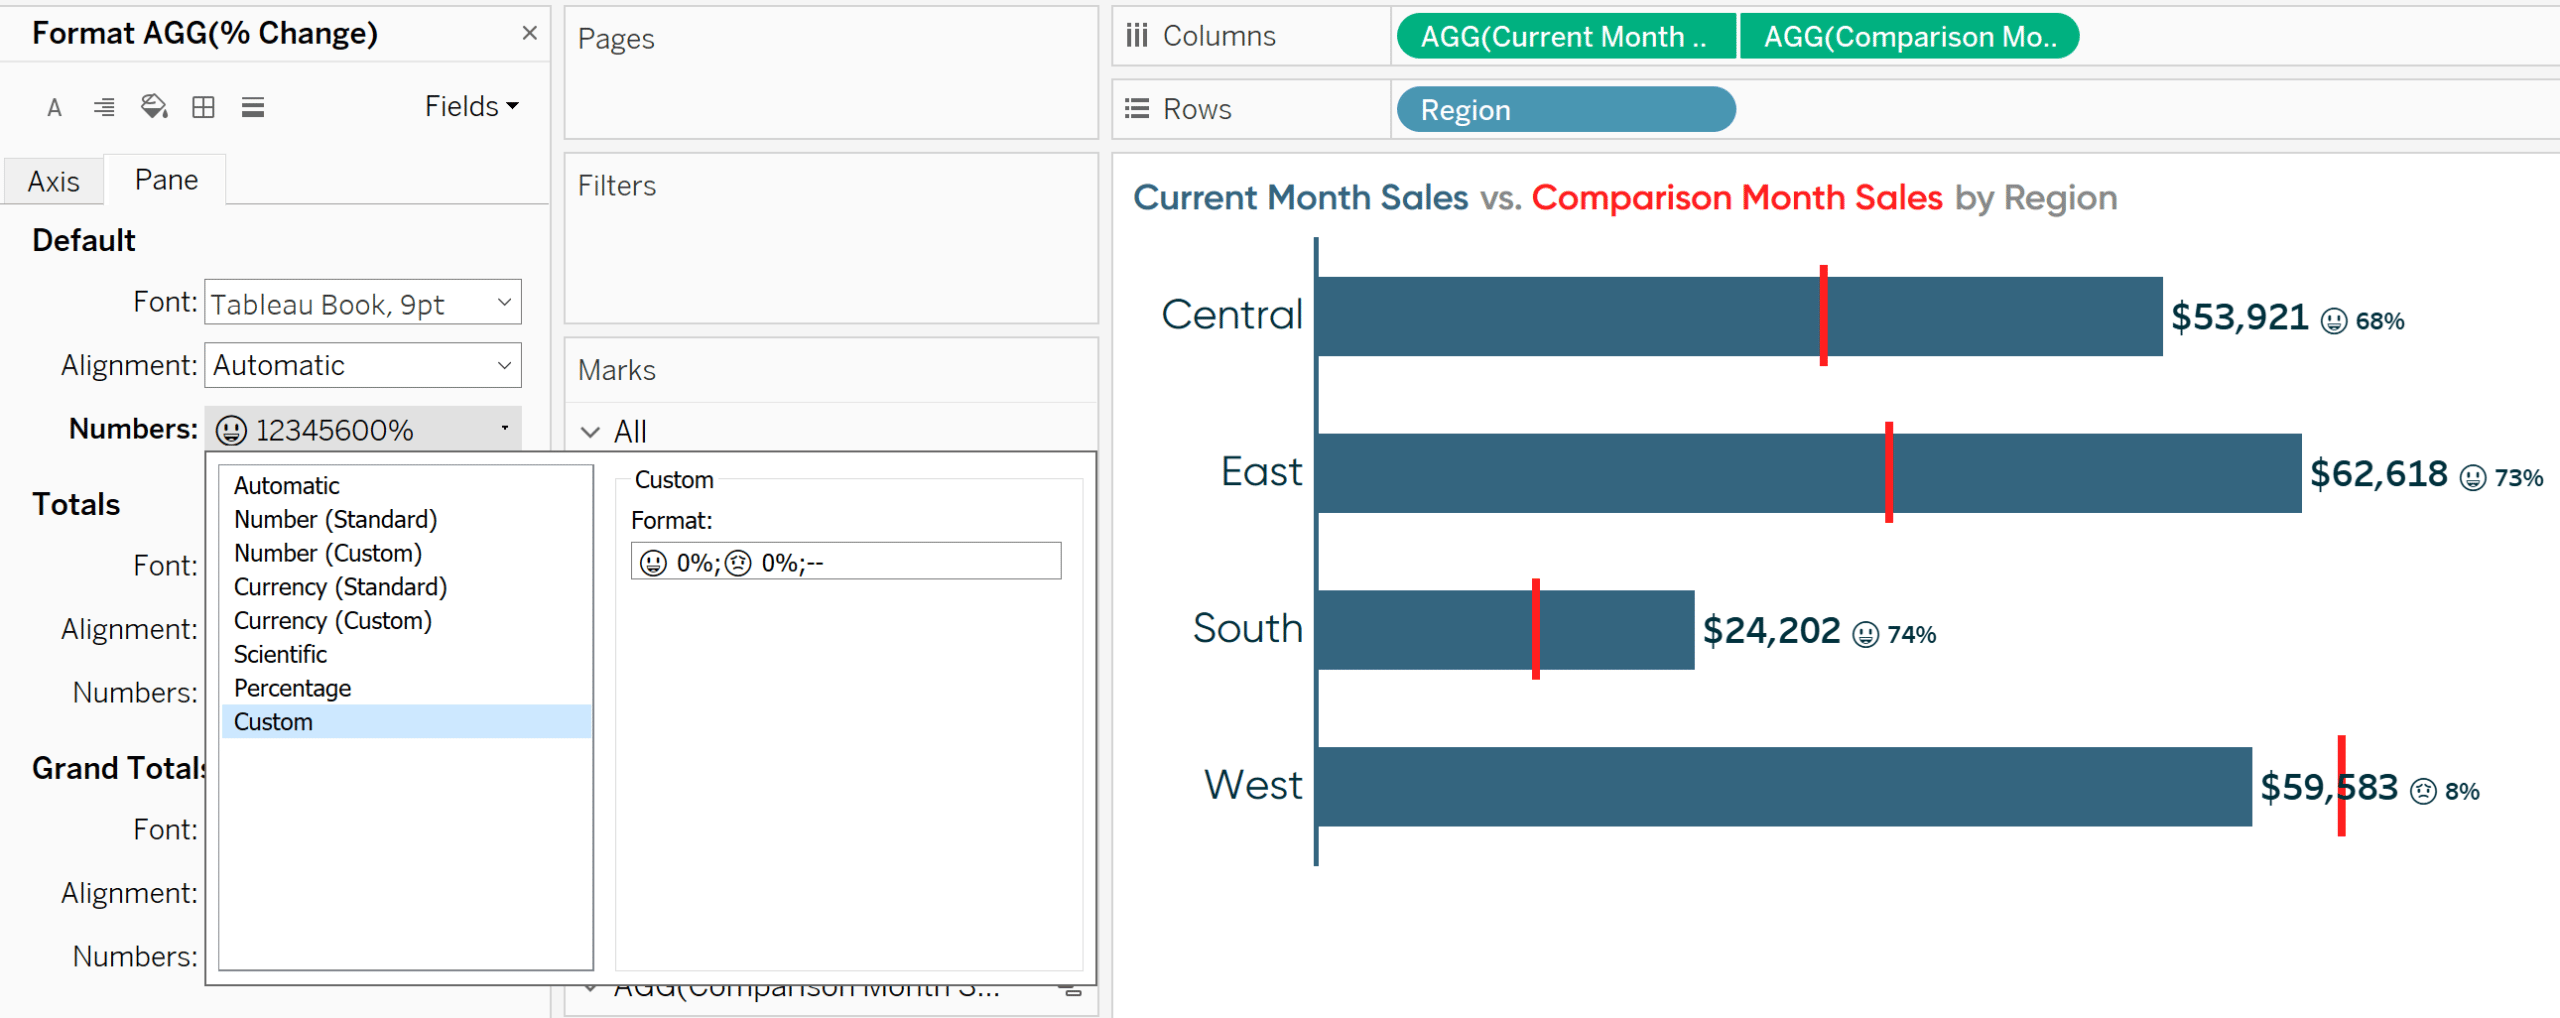
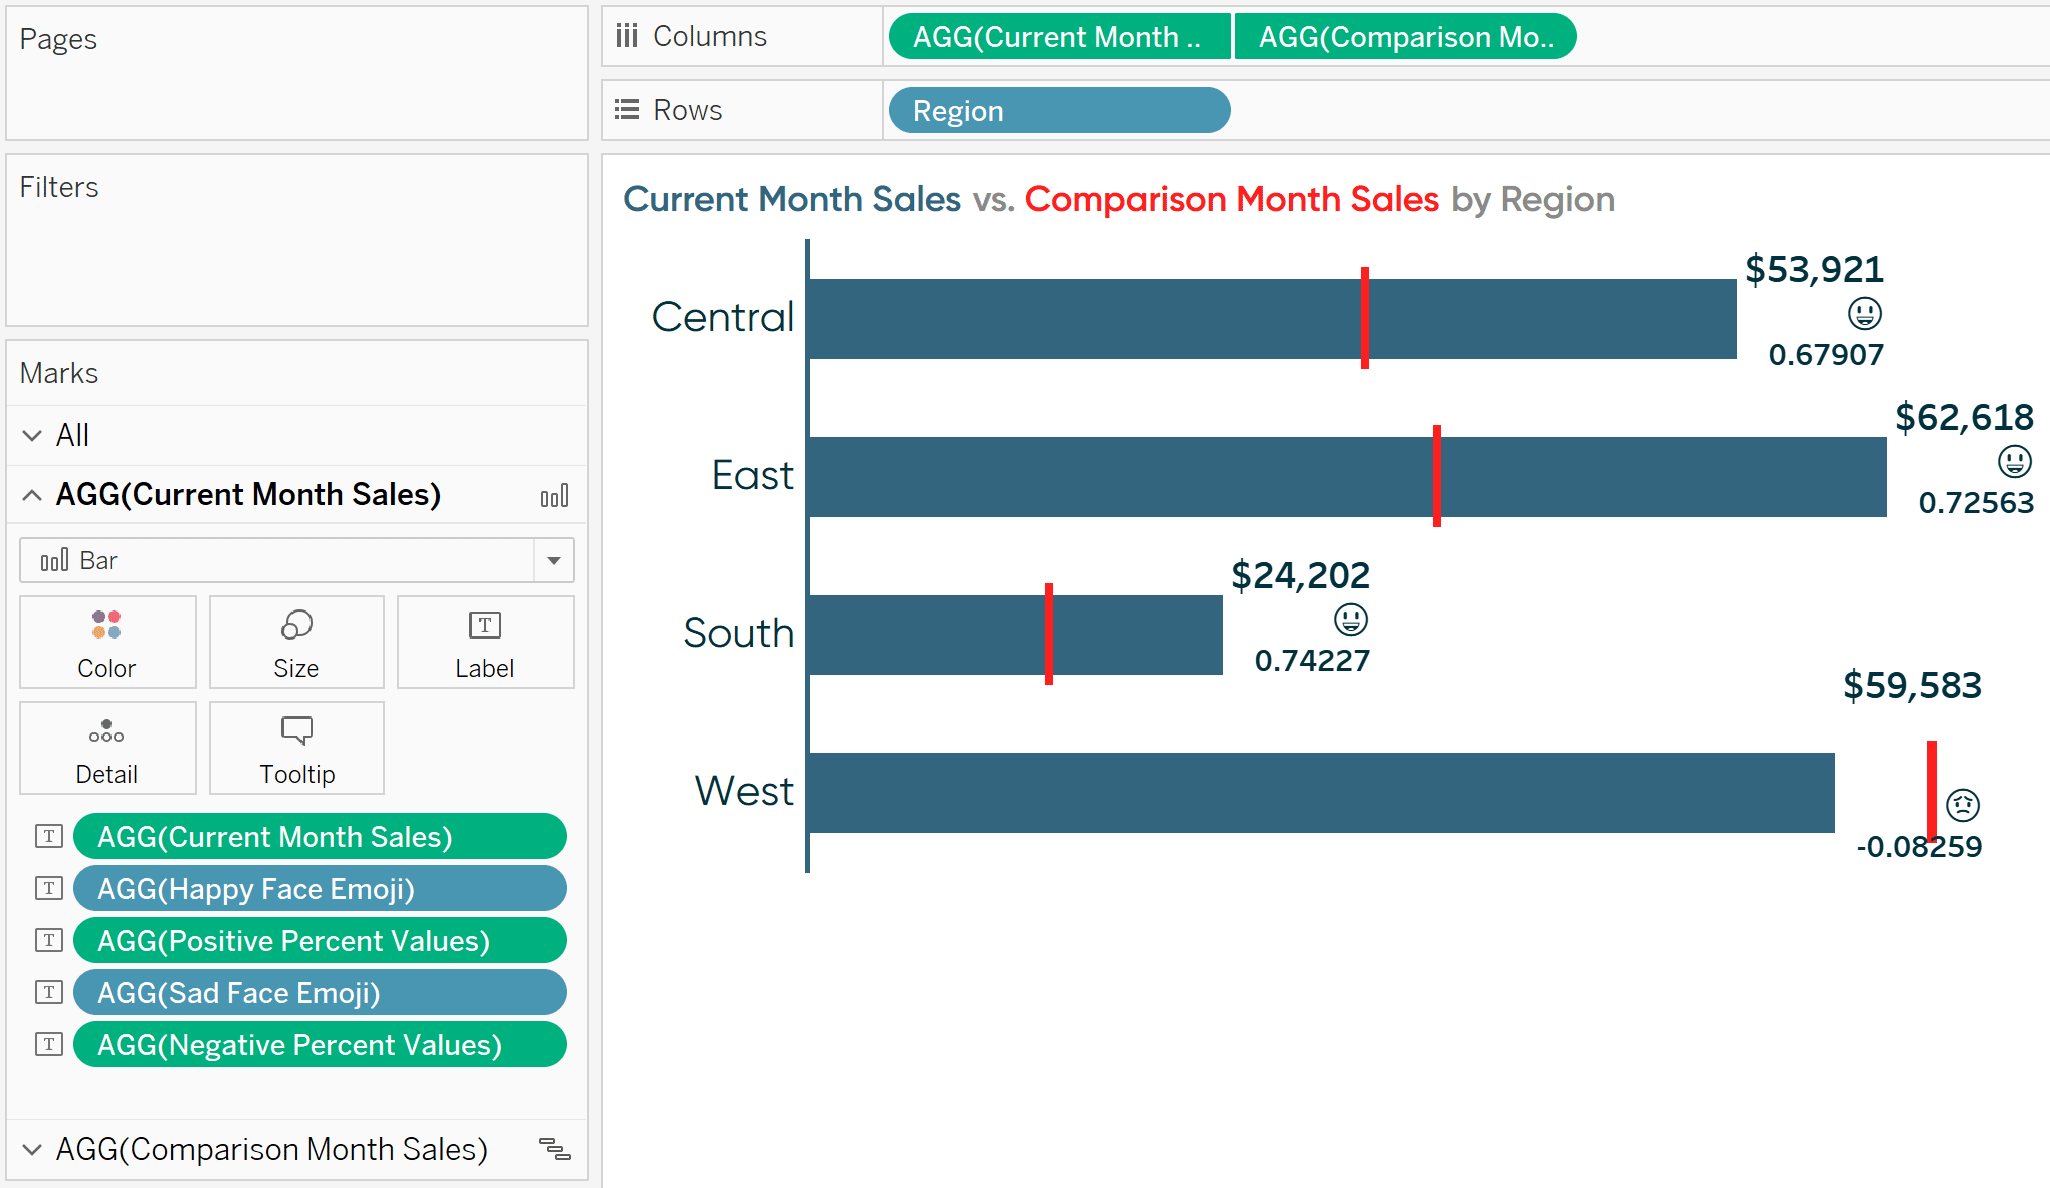
For all the examples in this post, nosotros will be making changes to this Current Month vs. Comparing Month by Region bullet graph. I've currently selected October vs. July in the Sample – Superstore dataset.
View / Interact / Download ›
The labels of each bar are displaying the current operation for each region followed past the period over menses change in percent terms. However, it is not clear what the percentages correspond, peculiarly when the changes are positive. The percentages could correspond percent of total, percent of goal, percent of the year that has passed, or something else entirely.
To help imply that the changes are either positive or negative, at a minimum, I'd similar to add a plus sign earlier the positive values. To modify the format of a specific measure on the view, right-click its pill and cull "Format…".
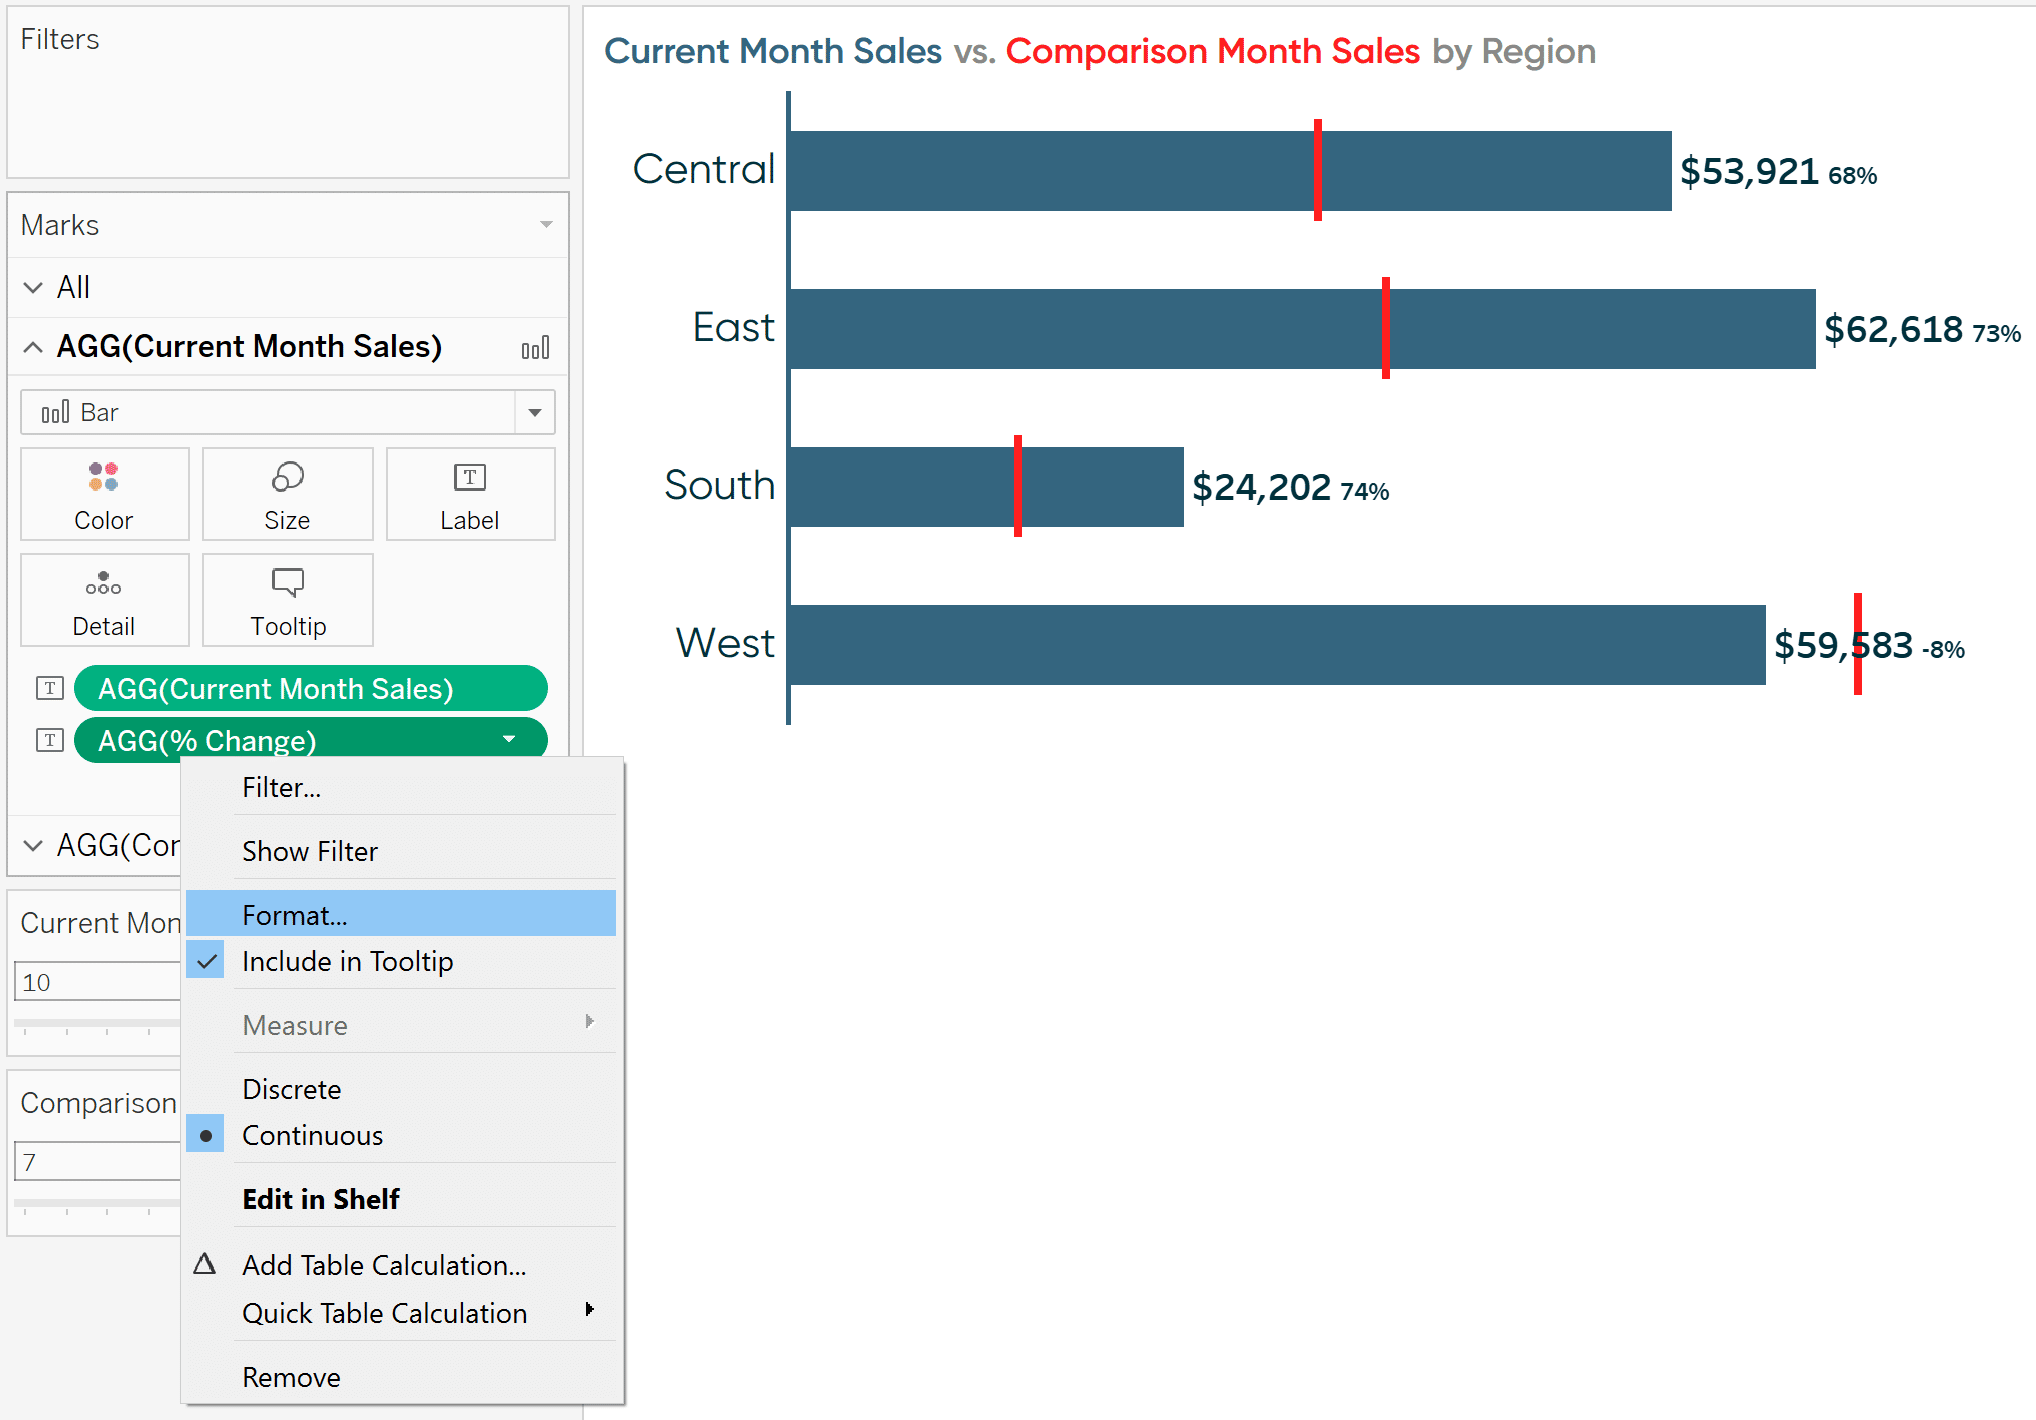
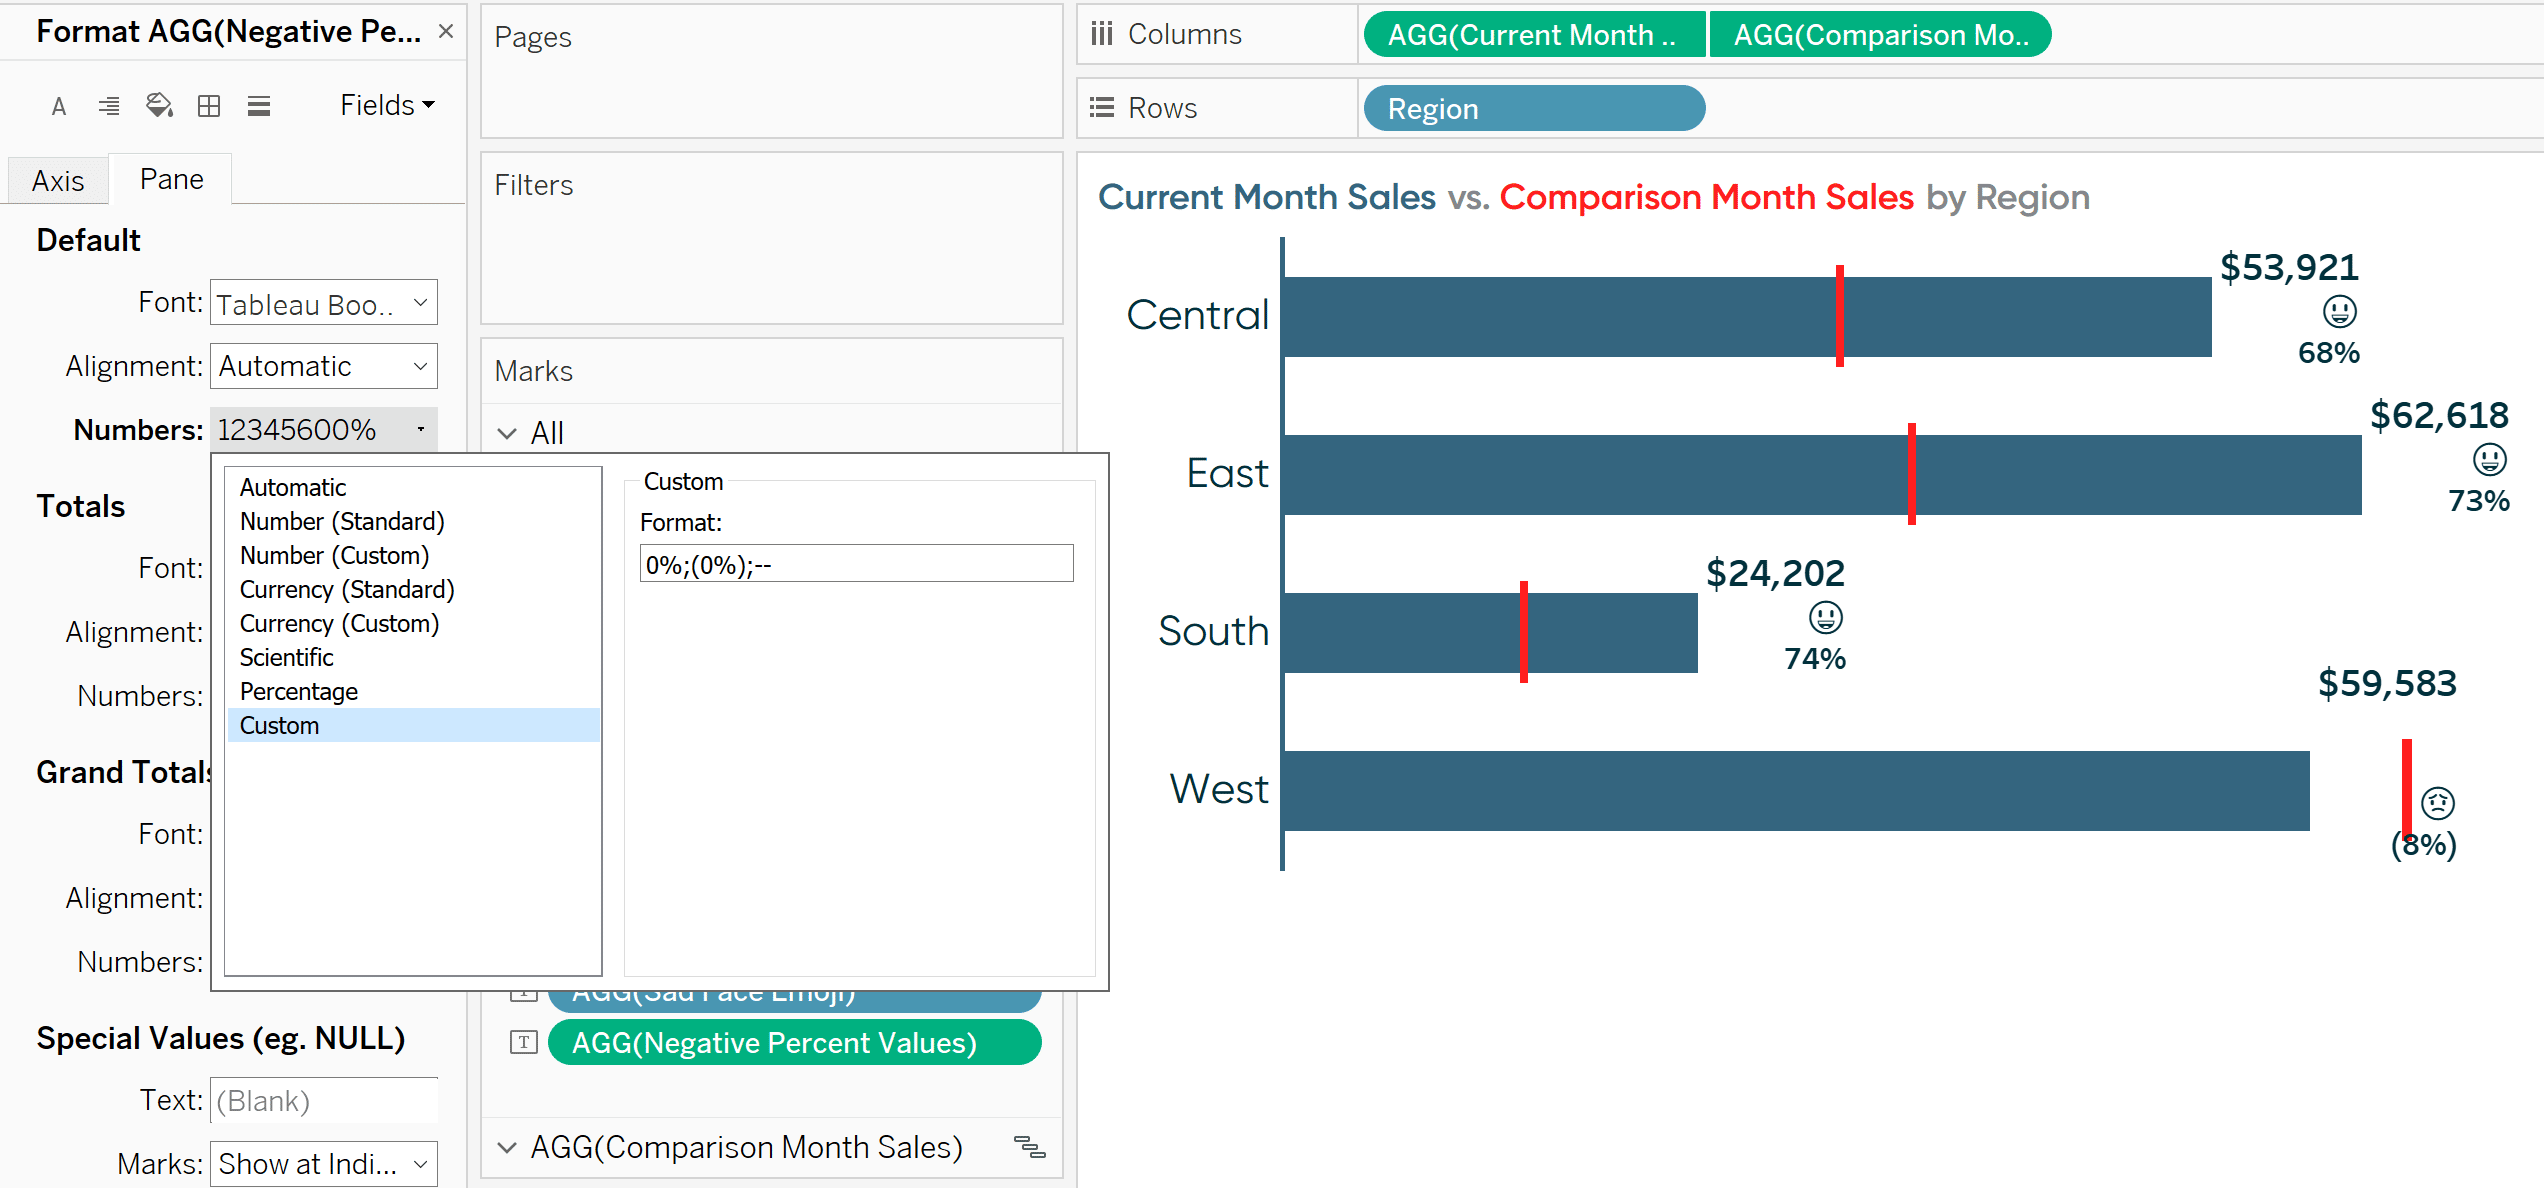
This will open the Format pane where you tin modify the format of the measure out on the centrality and/or inside the pane (i.e. the numbers on the chart itself). The chart I'm using does not have an axis, and so I volition modify the dropdown chosen "Numbers" on the Pane tab.
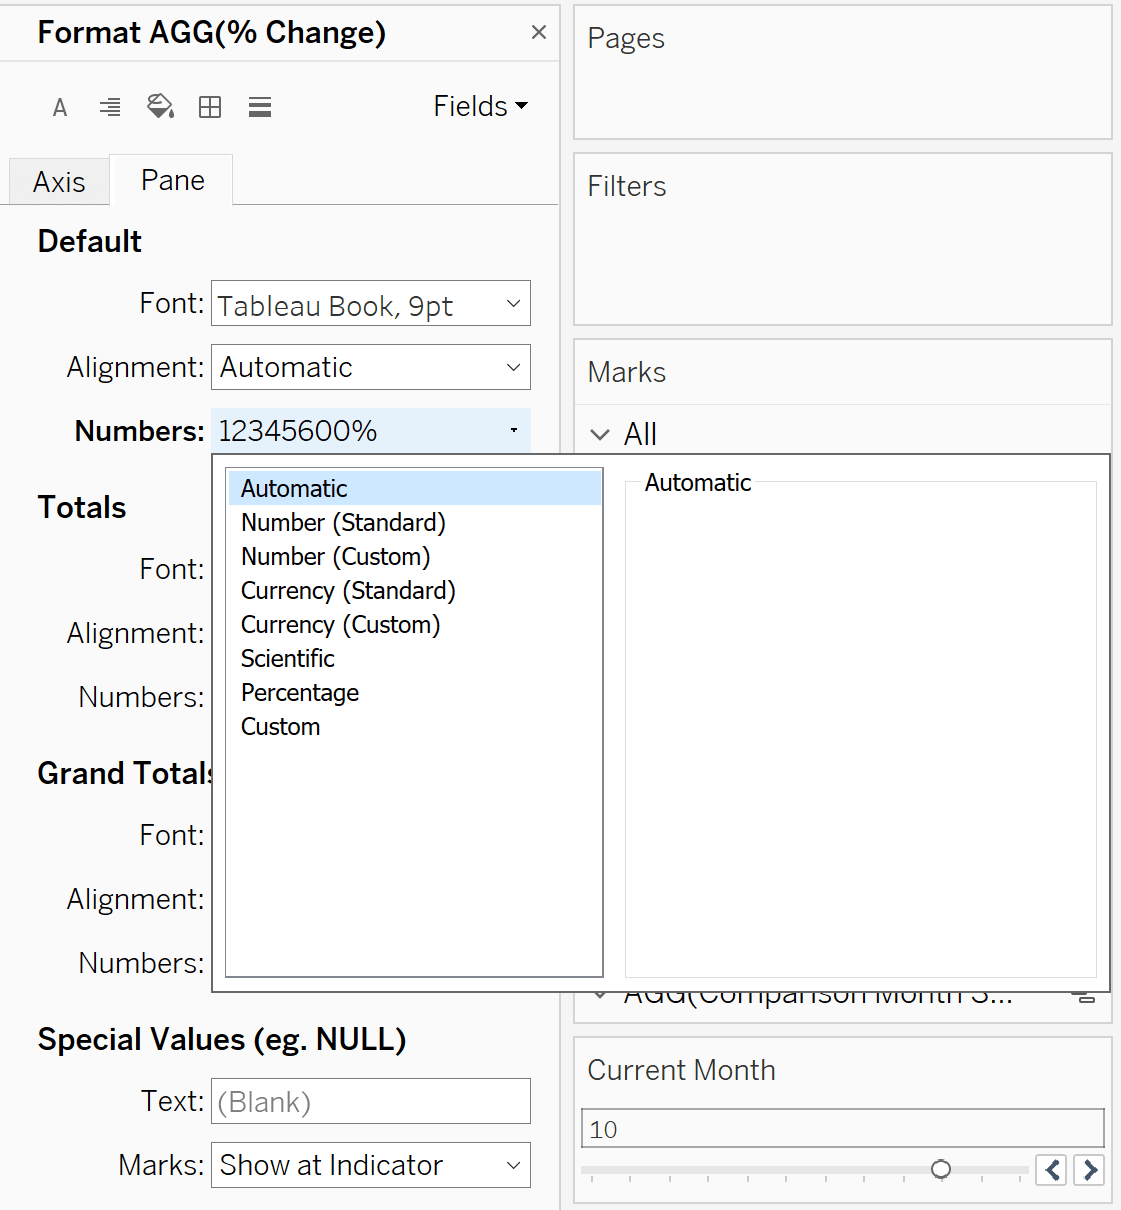
From here, if you navigate to the Custom options, the starting time format you type in the open "Format:" text box will be displayed when the measure out is positive, the 2nd format you blazon volition be displayed when the measure is negative, and, optionally, the third format you lot type will exist displayed when the measure out is neither positive or negative.
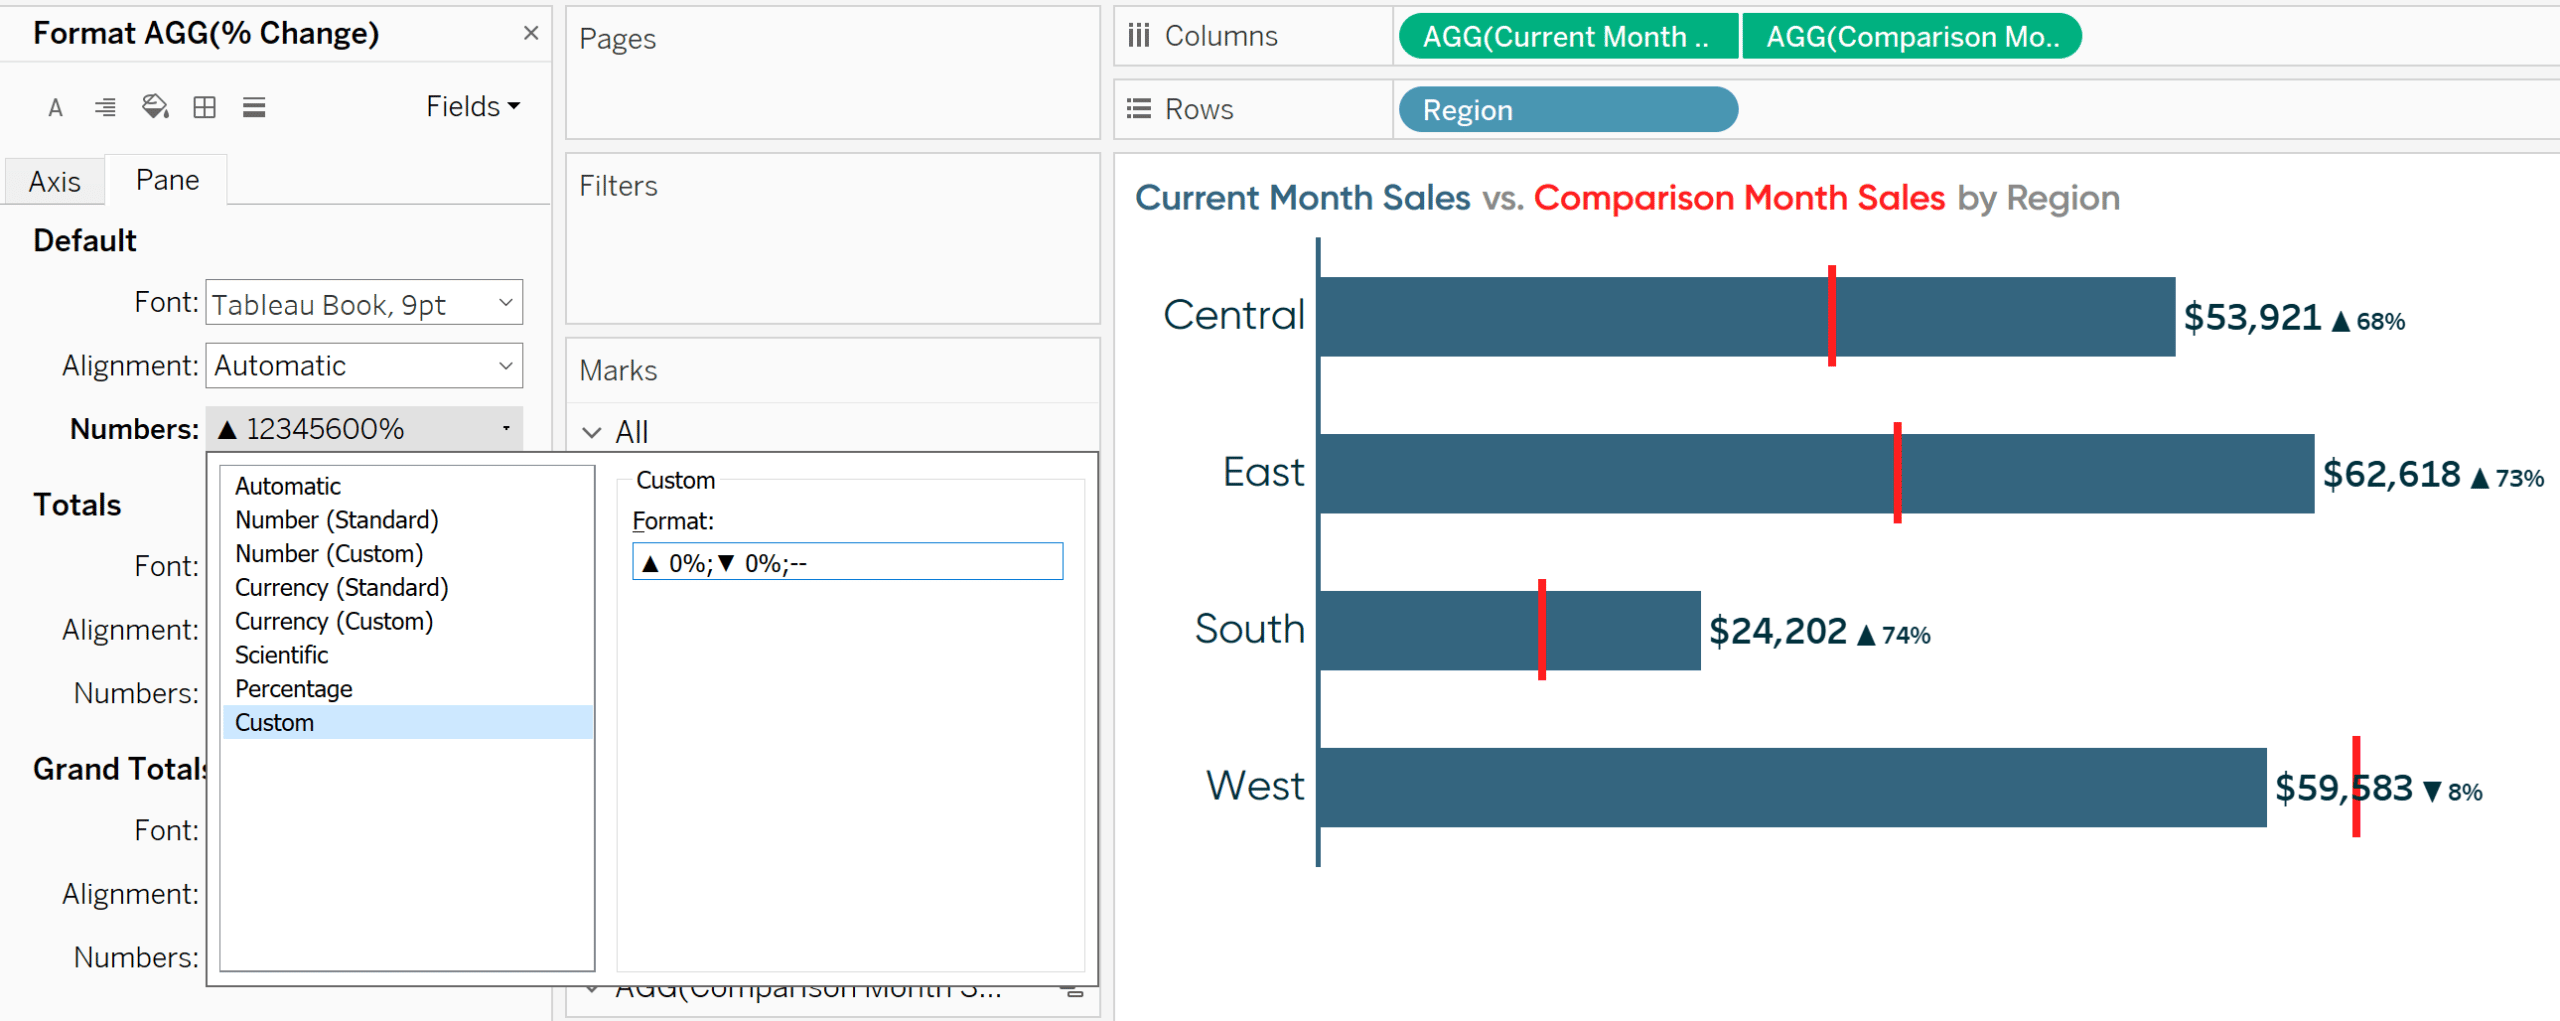
Measure formats should exist separated by the semicolon punctuation mark (;). Here's how my custom formatting looks if I desire to display a plus sign earlier positive values followed by a percent sign and no decimal places, a negative sign before negative values followed by a percent sign and no decimal places, and 2 dashes when the value is null, or neither positive or negative.

If you lot would always like a measure to start out formatted a specific way when it is added to a new view, you can too set the "default formatting" of a mensurate by right-clicking on information technology in the Measures area of the Data pane on the left, hovering over "Default Backdrop", and choosing "Number Format…".
The technique outlined to this betoken is also how you can conditionally display an up triangle (▲) for positive changes and a down triangle for negative changes (▼). Y'all would simply supervene upon the plus sign with the up triangle and negative sign with the down triangle.
To do so, you can either re-create and paste the symbols from this tutorial, or you lot tin can create the symbols with alt codes. The up triangle is created by property down the alt cardinal while you blazon the number 30; the down triangle is created by holding down the alt cardinal while you blazon the number 31.
Here's how my view looks after customizing the number format with alt code characters.
But did you lot know you tin format measures with any alt code character including emojis? Here'southward how my view looks later on customizing the number format with a happy emoji (alt+128515) for positive changes and a sad emoji (alt+128543) for negative changes.
I've experienced mixed success with typing alt code characters directly into Tableau – specially when using emojis – so your best bet is to copy and paste the emojis of your liking. For example, alt+i (☺) works great, but others sometimes event in unexpected characters.
How to conditionally format the size and colour of measures in Tableau
In the latest view, the happy face up implies something positive happened and the pitiful face up implies something negative happened. To bulldoze the point abode, I may want to double-encode the symbol so it not only dynamically changes betwixt its positive and negative characters, but is also colored based on if the change was positive or negative.
Further, the emojis are relatively small and challenging to decipher. I would adopt the emojis be larger, merely leave the size of the percentage values equally is.
Both requirements pose a claiming because, by default, measures in Tableau share the same format whether they are positive or negative. So, I could change the size of the measure to make the emojis larger, but then the per centum values would also exist larger. I could change the color of the measure to blue because most of the changes were positive, but the emoji and pct value for the West region would as well be blue even though its change was negative.
The trick for getting around this so y'all tin can conditionally format both the size and color of measures is to create a calculated field for each component of the text you want to conditionally format.
If you use the Firsthand IF (IIF) function, you tin set upwards each calculated measure to but display when a sure benchmark is met (i.due east. a positive change). Since each mensurate volition create its own text on the nautical chart, they can be formatted independently.
I tin make the happy face emojis blue and a larger size than the percentage values, the sad face up emojis ruddy and a larger size than the percent values, the positive per centum values blue, and the negative percent values red. That's four unlike formats for what is perceived to be one measure by the audience.
Hither are the series of calculated fields I would need to create this experience:
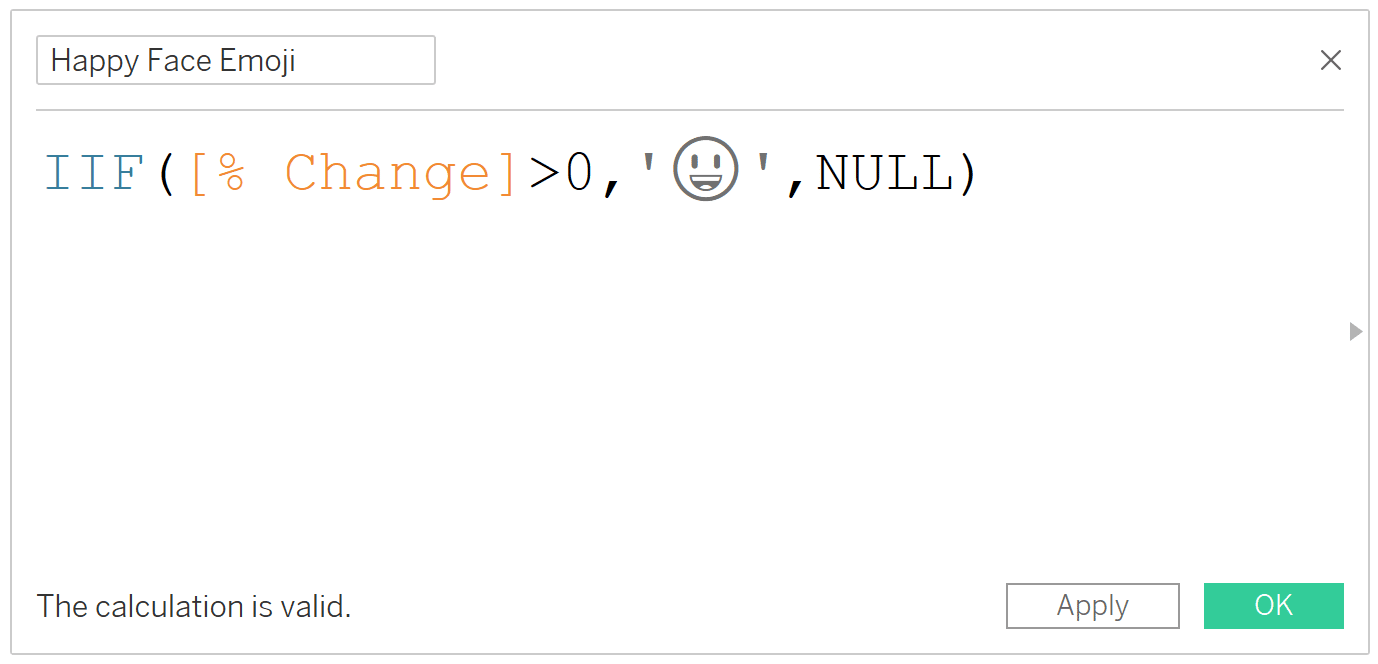
Happy Face Emoji
IIF([% Change]>0,' ',Nil)
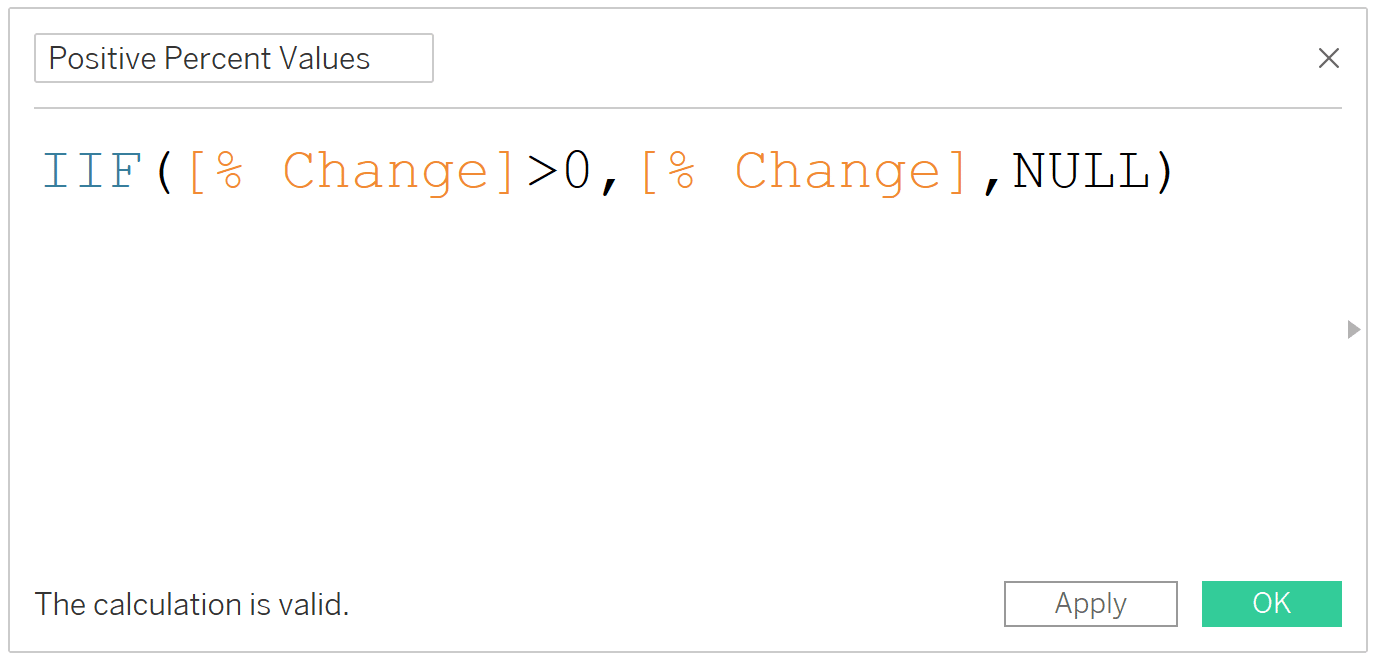
Positive Pct Values
IIF([% Change]>0,[% Change],NULL)
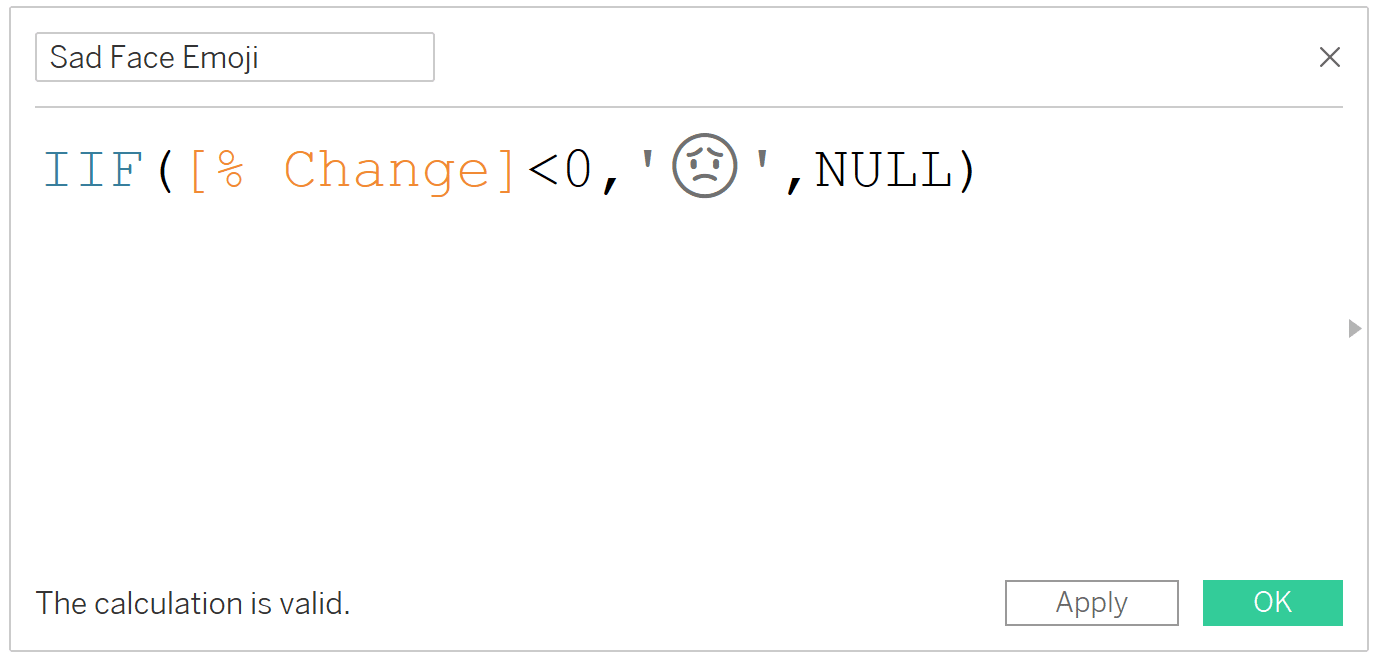
Sad Face Emoji
IIF([% Modify]<0,' ',NULL)
Negative Percent Values
IIF([% Change]<0,[% Change],Null)

One time you accept created a calculated field for each element yous want to independently format, identify them all on the Label Marks Card (or wherever you are wanting to see the fields).
Each of the fields pictured on the Label Marks Card are independent, so I can change their formatting independently. This time, I'll change the custom formatting of the pct values to "0%;(0%);–" and leave the emojis equally is.
Hither's the reason this works. Now that I've got all the independent fields on the Label Marks Menu, I can click on the Label Marks Card to change the fields' size and color independently.
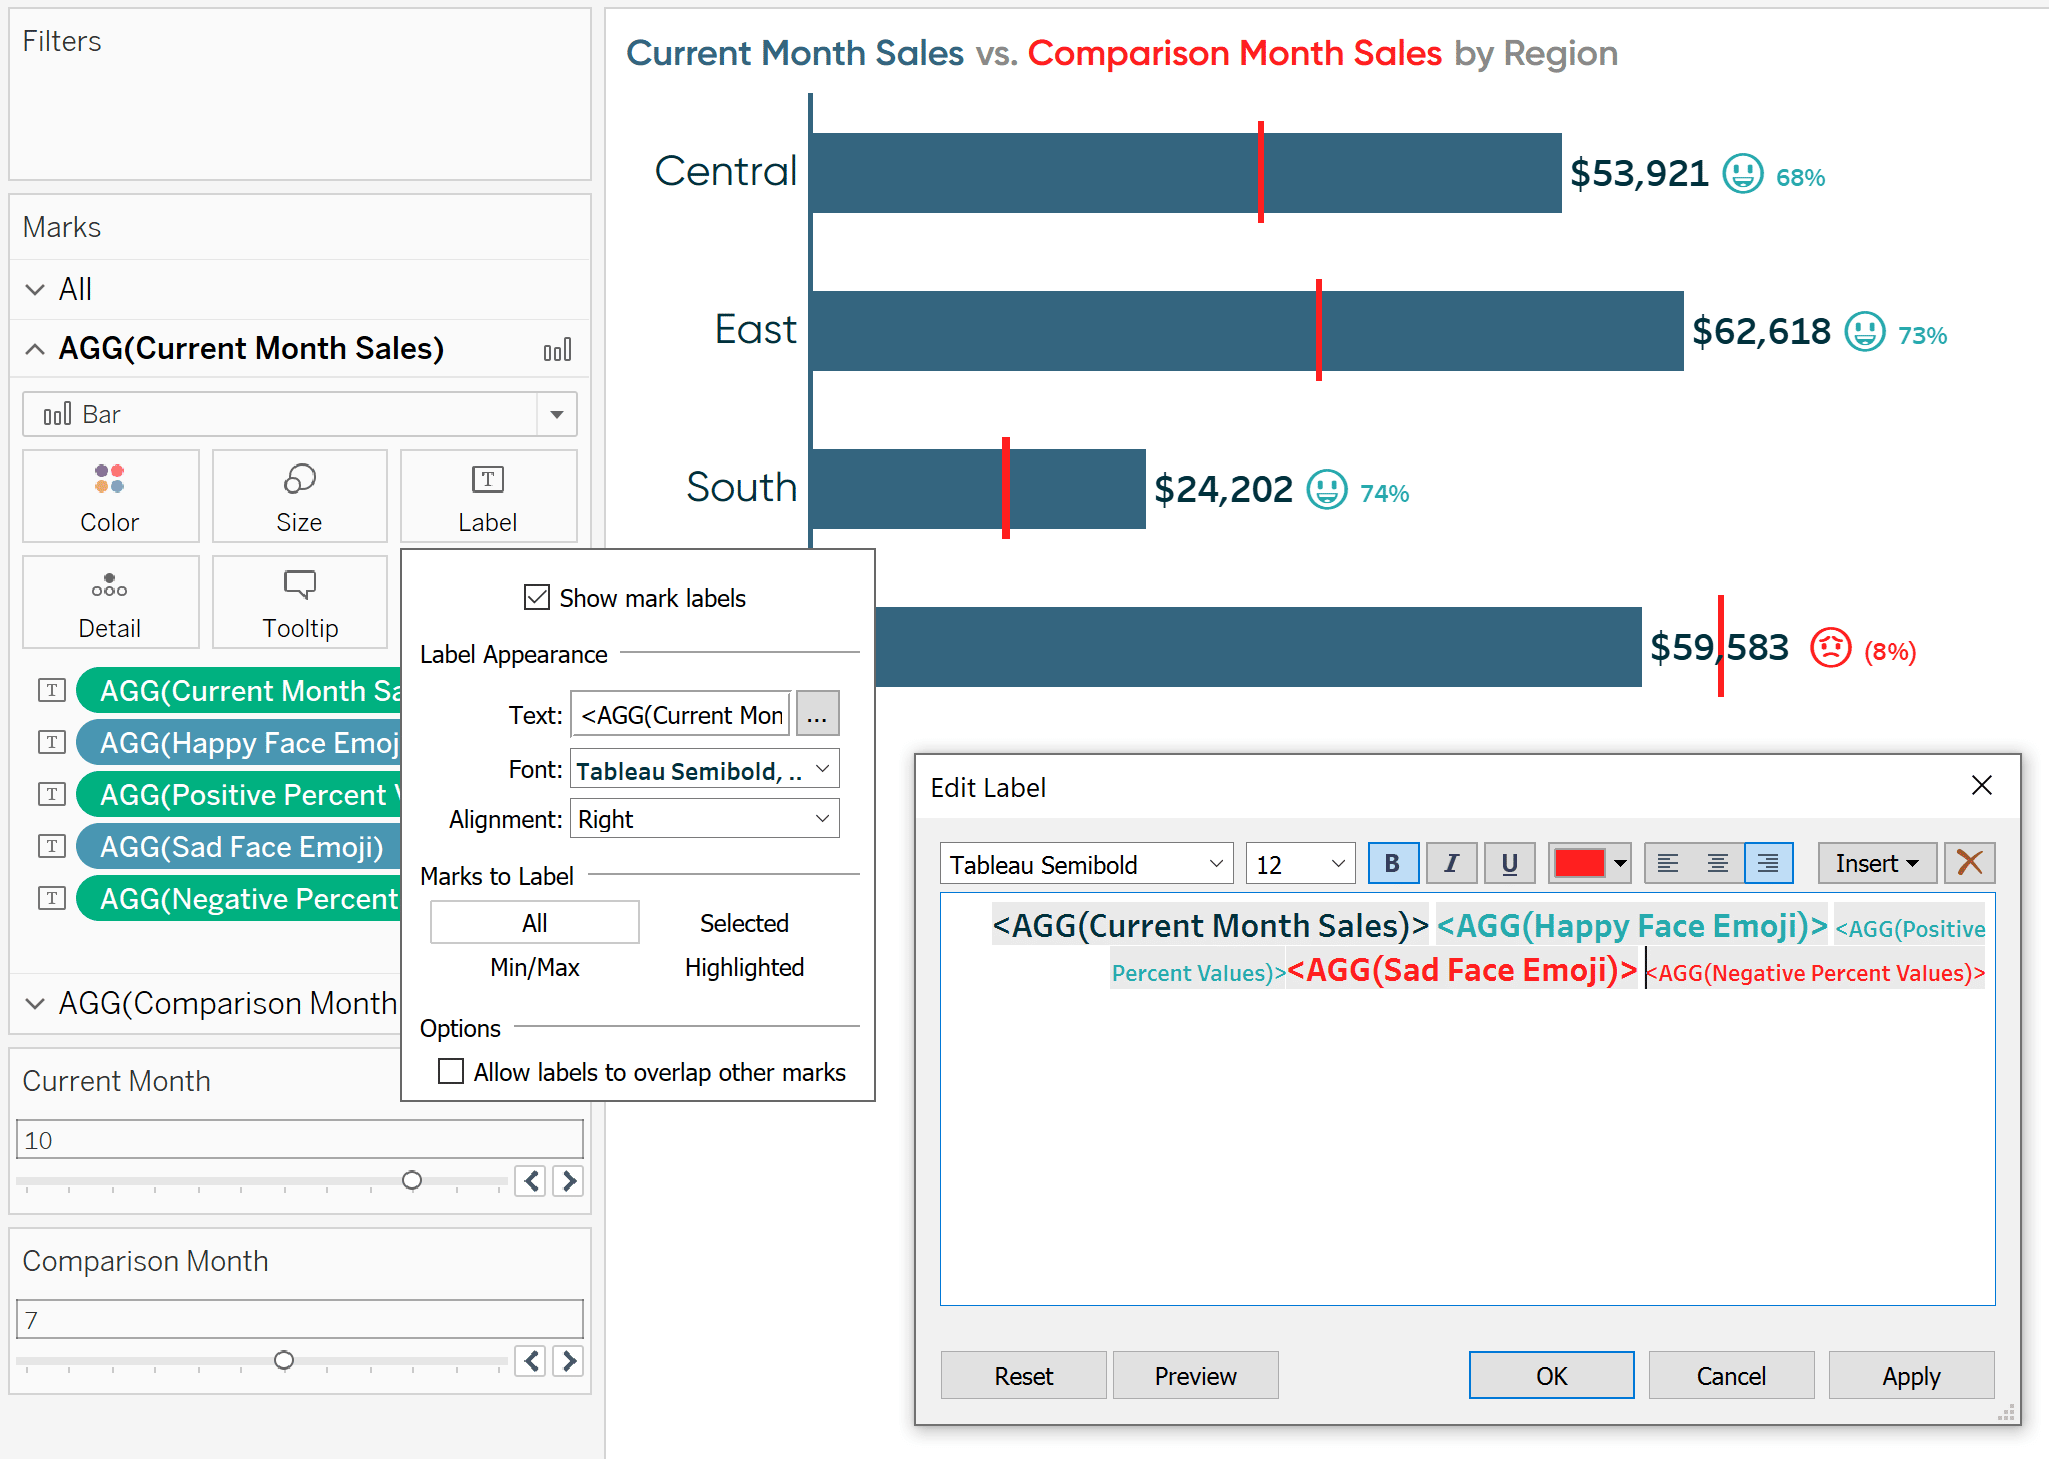
See the nautical chart in the background? Since nosotros used a series of IIF statements to compute each result, only the appropriate fields appear for either a positive or negative alter!
How to conditionally format measures based on a parameter pick
As mentioned in this postal service's introduction, I've shared before how to dynamically alter a mensurate's prefix and suffix. This tactic works bully when you are parameterizing a measure selection and is the virtually flexible conditional formatting option.
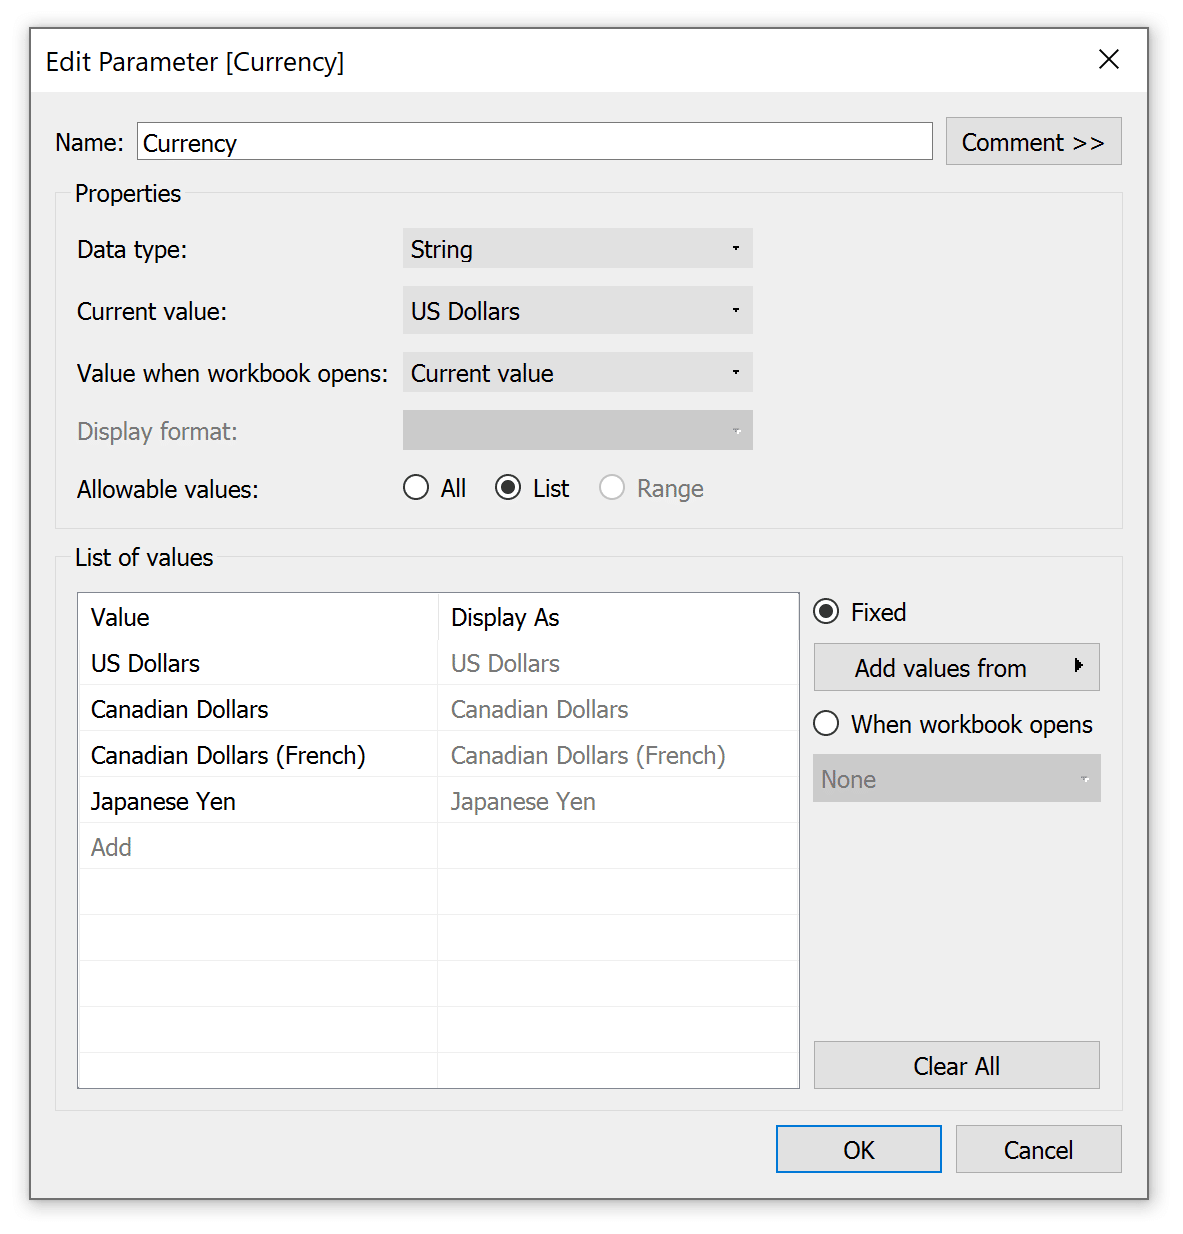
This same technique works perfectly when you are working with multiple currencies and allowing a user to select the currency via a parameter. By default, measures tin can only share ane format, merely what if you accept US Dollars (i.e. $one), Canadian Dollars (i.eastward. $ ane; note the space between the symbol and value), Canadian Dollars in French Canadian provinces (i.due east. 1 $), and Japanese Yen (i.eastward. ¥ 1).
To conditionally format the currency formatting based on the currency selected, start past creating a parameter with each of your currency names.
Next, create one calculated field for the prefix (i.e. the symbol that volition be shown before the currency value) and another for the suffix (i.east. the symbol that will be shown after the currency value).
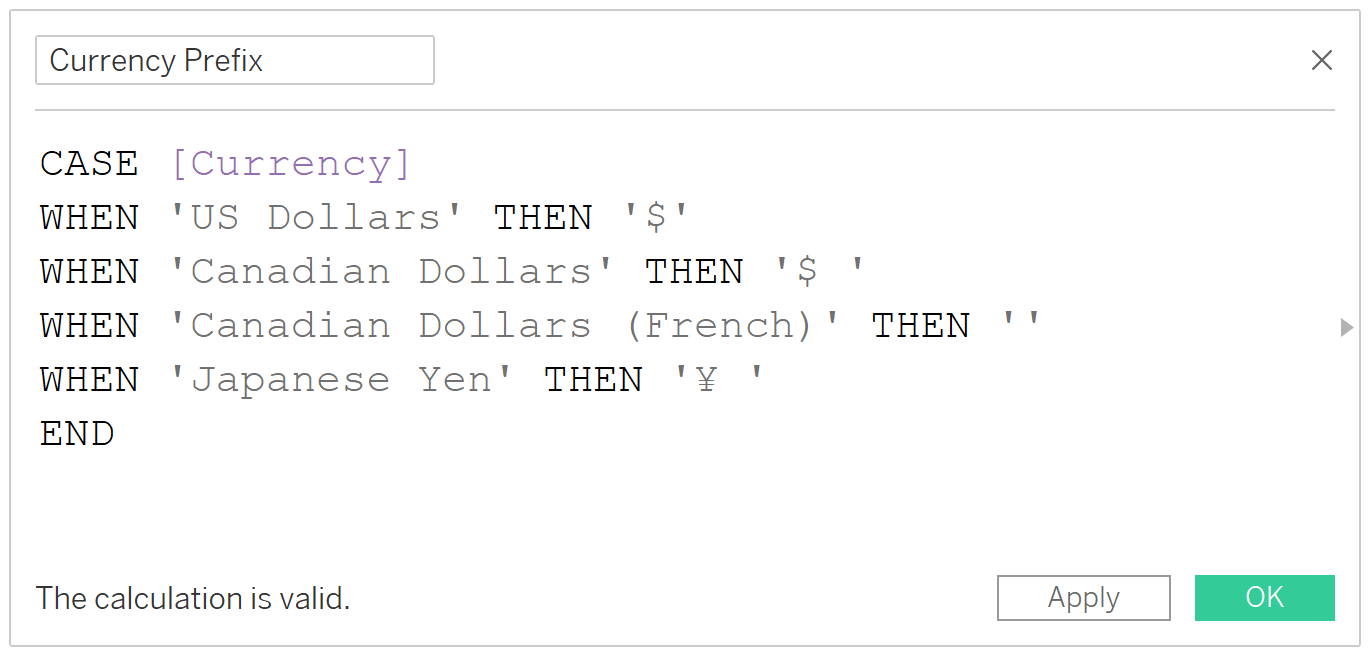
It'due south in these calculated fields that you're giving Tableau instructions for what to display when each value is selected in the parameter. For my Prefix calculated field, United states of america Dollars get a $ sign with no infinite, Canadian Dollars get a $ sign with a space, Japanese Yen get a ¥ sign with a space, and Canadian Dollars (French) get no prefix. The formula is:
CASE [Currency]
WHEN 'Usa Dollars' So '$'
WHEN 'Canadian Dollars' THEN '$ '
WHEN 'Canadian Dollars (French)' THEN "
WHEN 'Japanese Yen' THEN '¥ '
Finish
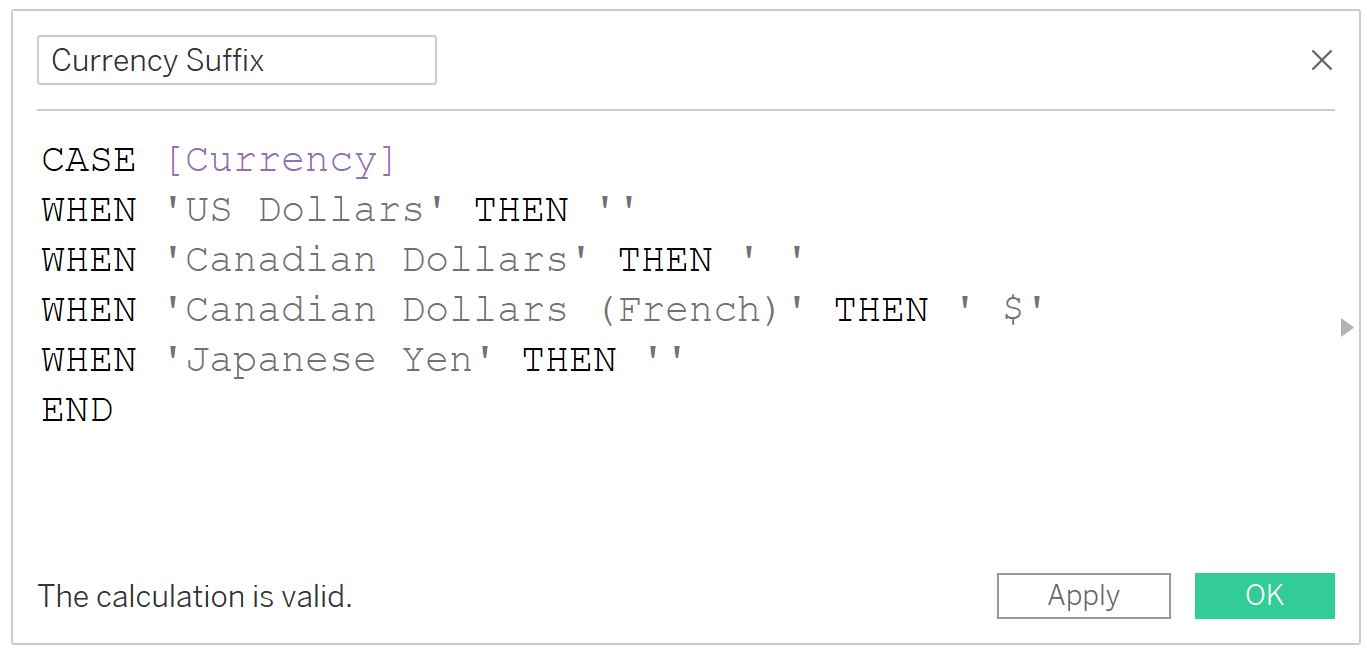
For my Suffix calculated field, merely Canadian Dollars (French) get a $ sign following the value. Everything else does not have a suffix, so I am just displaying two tick marks which won't display anything.
Case [Currency]
WHEN 'US Dollars' So "
WHEN 'Canadian Dollars' And so ' '
WHEN 'Canadian Dollars (French)' So ' $'
WHEN 'Japanese Yen' And so "
END
Since we are simply displaying a suffix for one of the parameter values this fourth dimension and nothing for everything else, this formula tin also exist written as:
IIF([Currency]='Canadian Dollars (French)',' $',Naught)
When implementing this approach, the currency symbols are controlled by the parameter pick and non part of the measure itself. So, before I add these fields to the view, I'm going to change the format of the currency already on the labels to Number (Custom) with no decimal places.
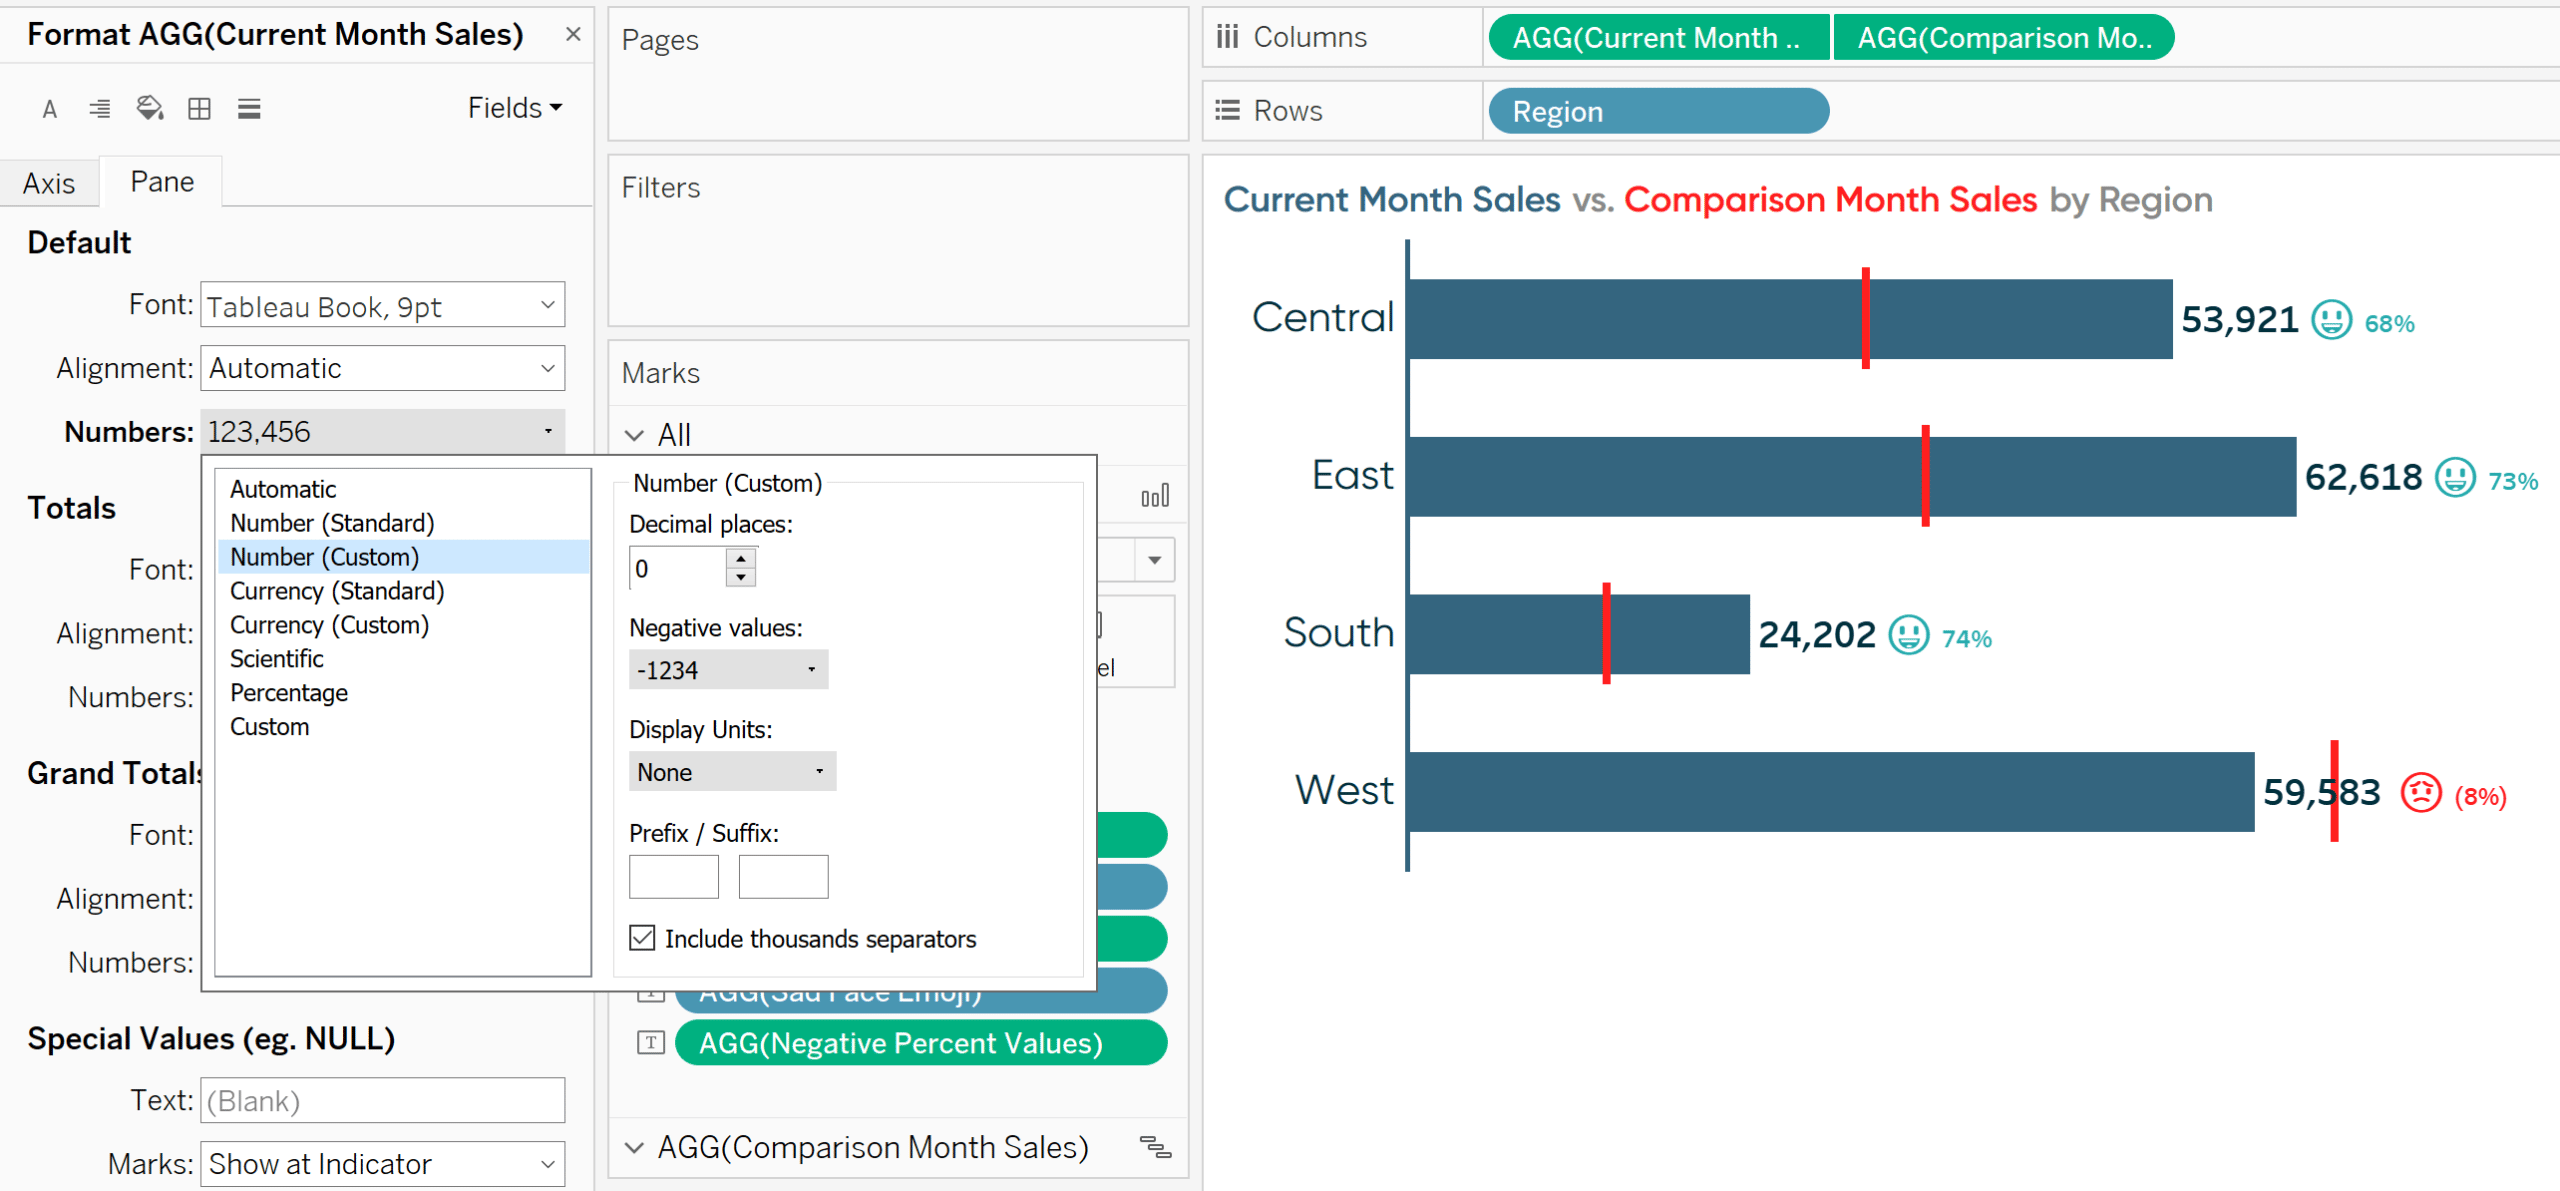
Note the dollar signs on the bar labels went away.
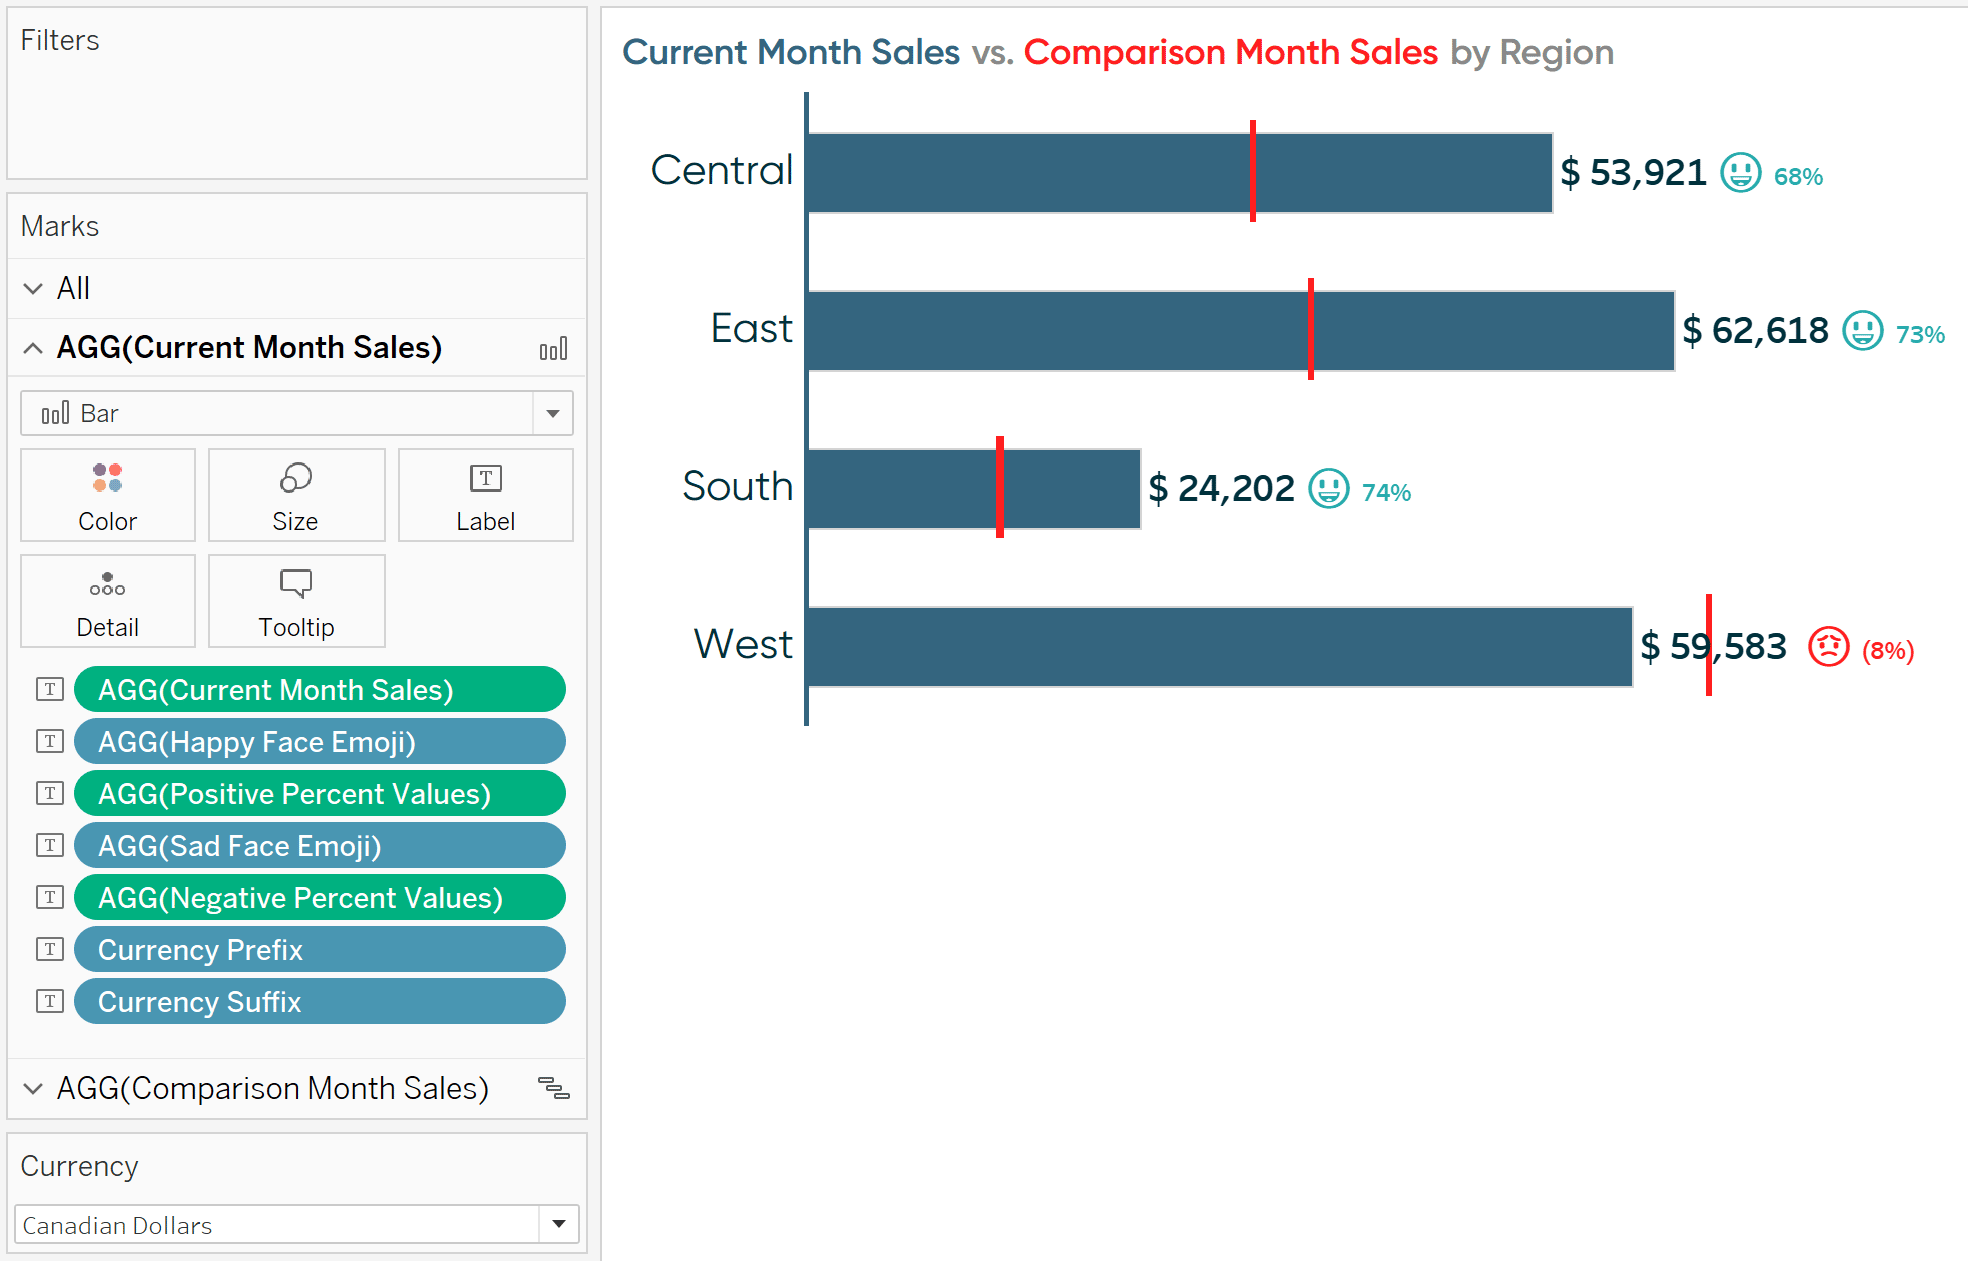
Now I will add together the newly created Currency Prefix and Currency Suffix calculated fields to the Label Marks Card. But like the 2d tip in this post, once something is on the Characterization Marks Card, I can click into the bill of fare and copy and paste the fields exactly where I want on the characterization. I'll place the prefix right before the Current Month Sales value and the suffix right after the Current Month Sales value with matching formatting.
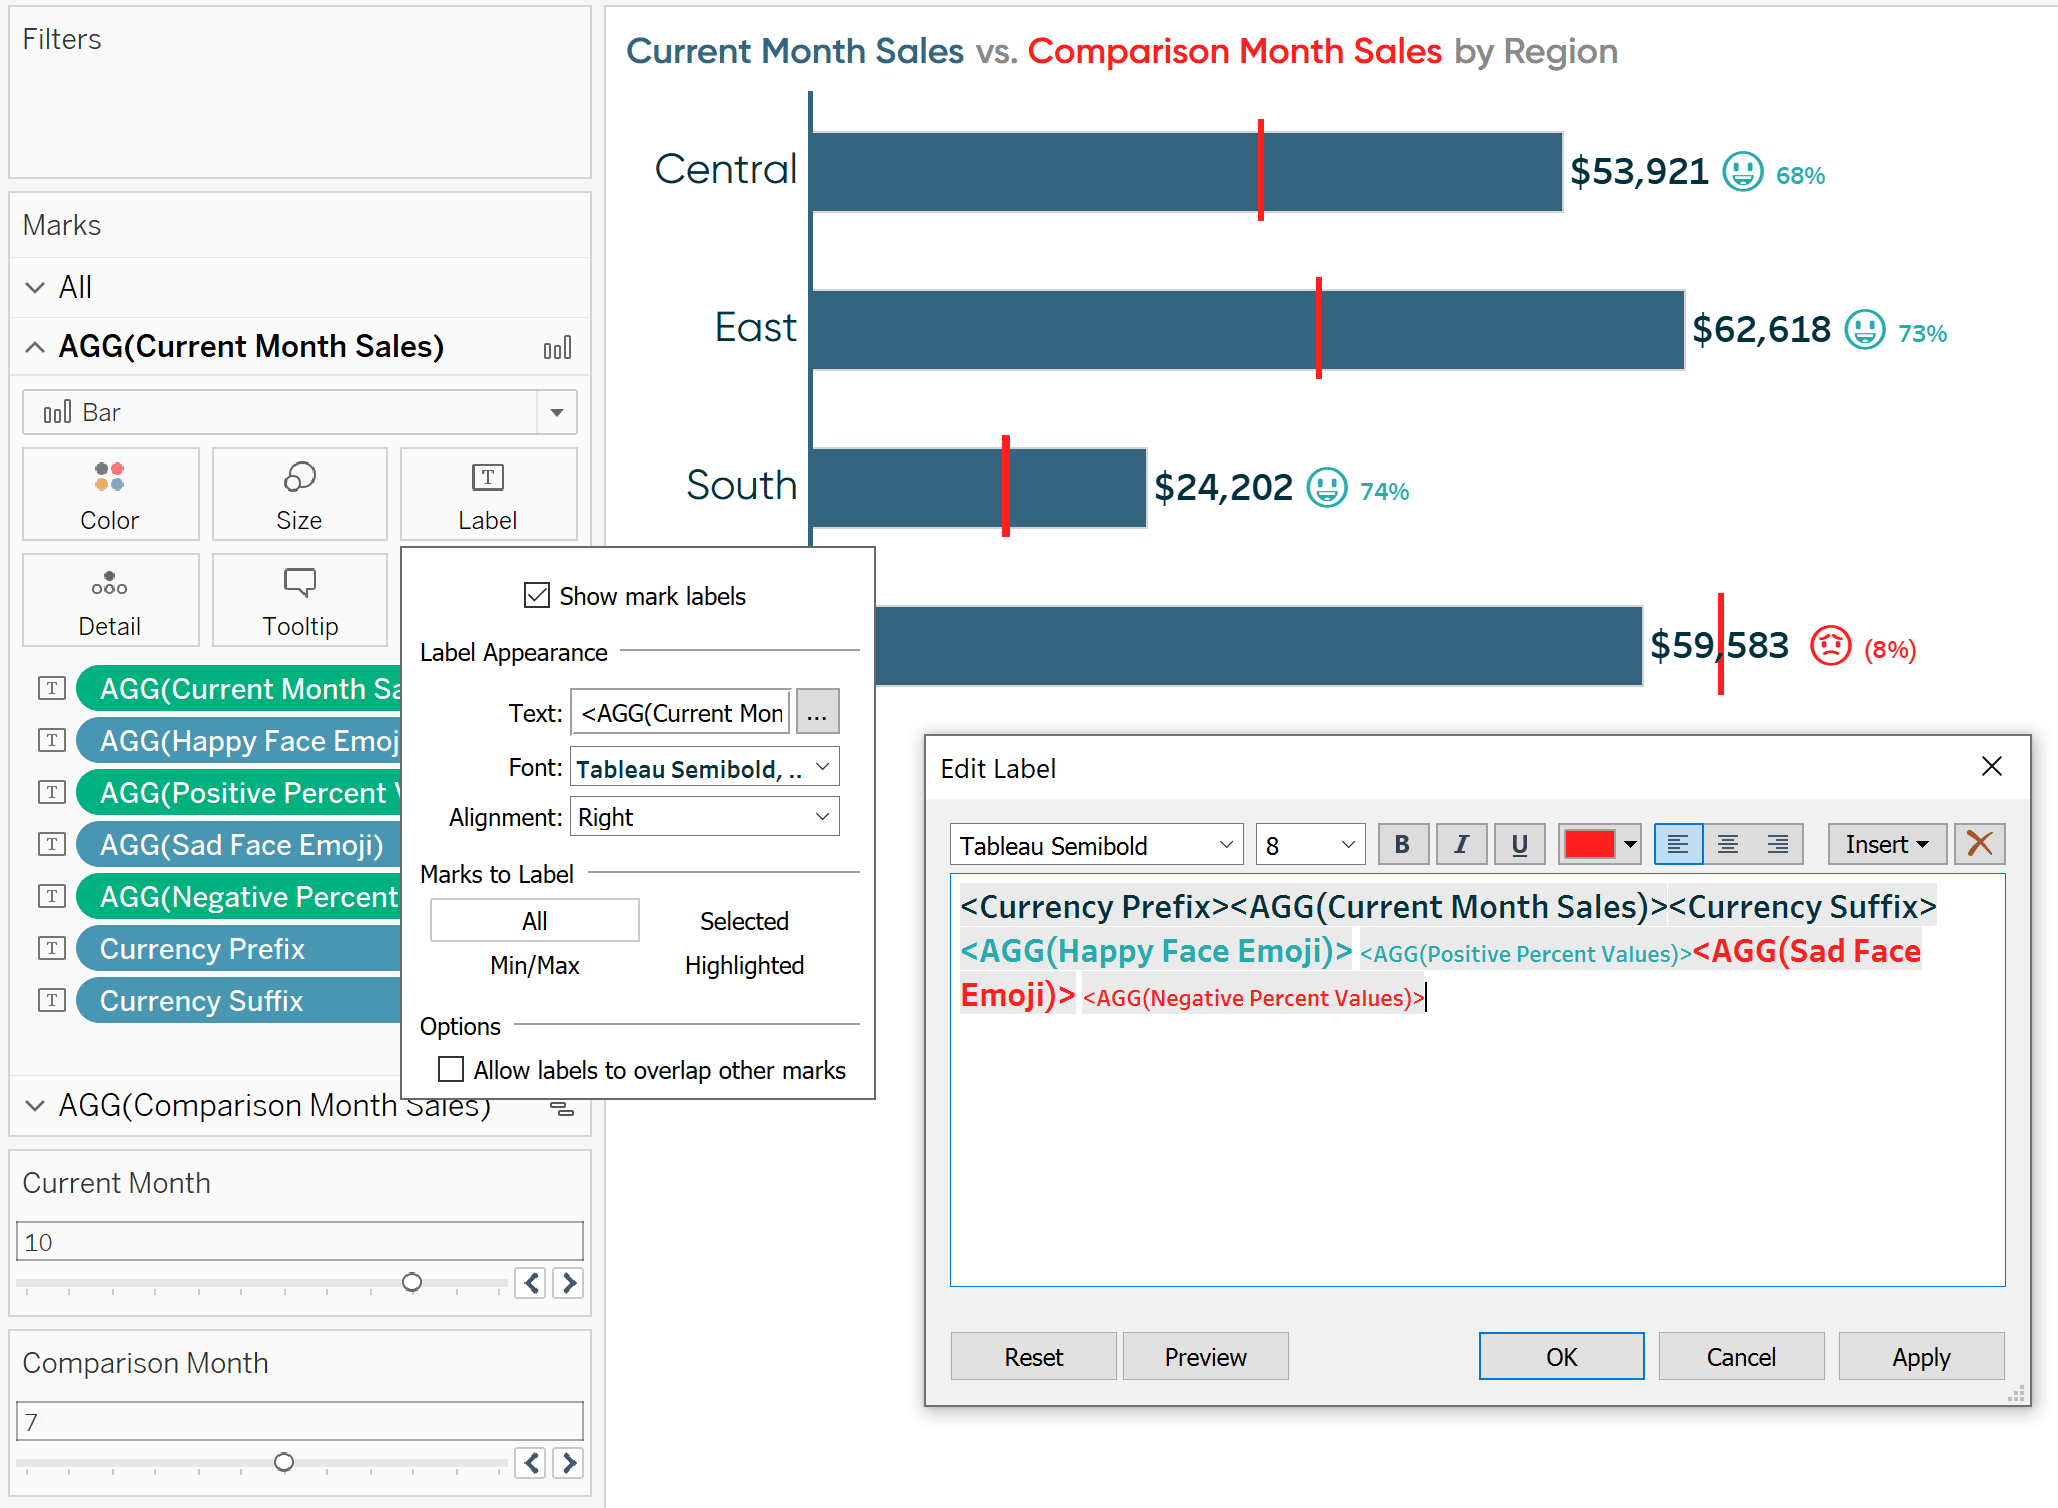
As you tin can see in the background of this epitome, since United states of america Dollars is the electric current option in the parameter, there is a $ sign prefix and no suffix. If I modify the parameter value to Canadian Dollars, we meet a $ sign with a space before the value and no suffix.
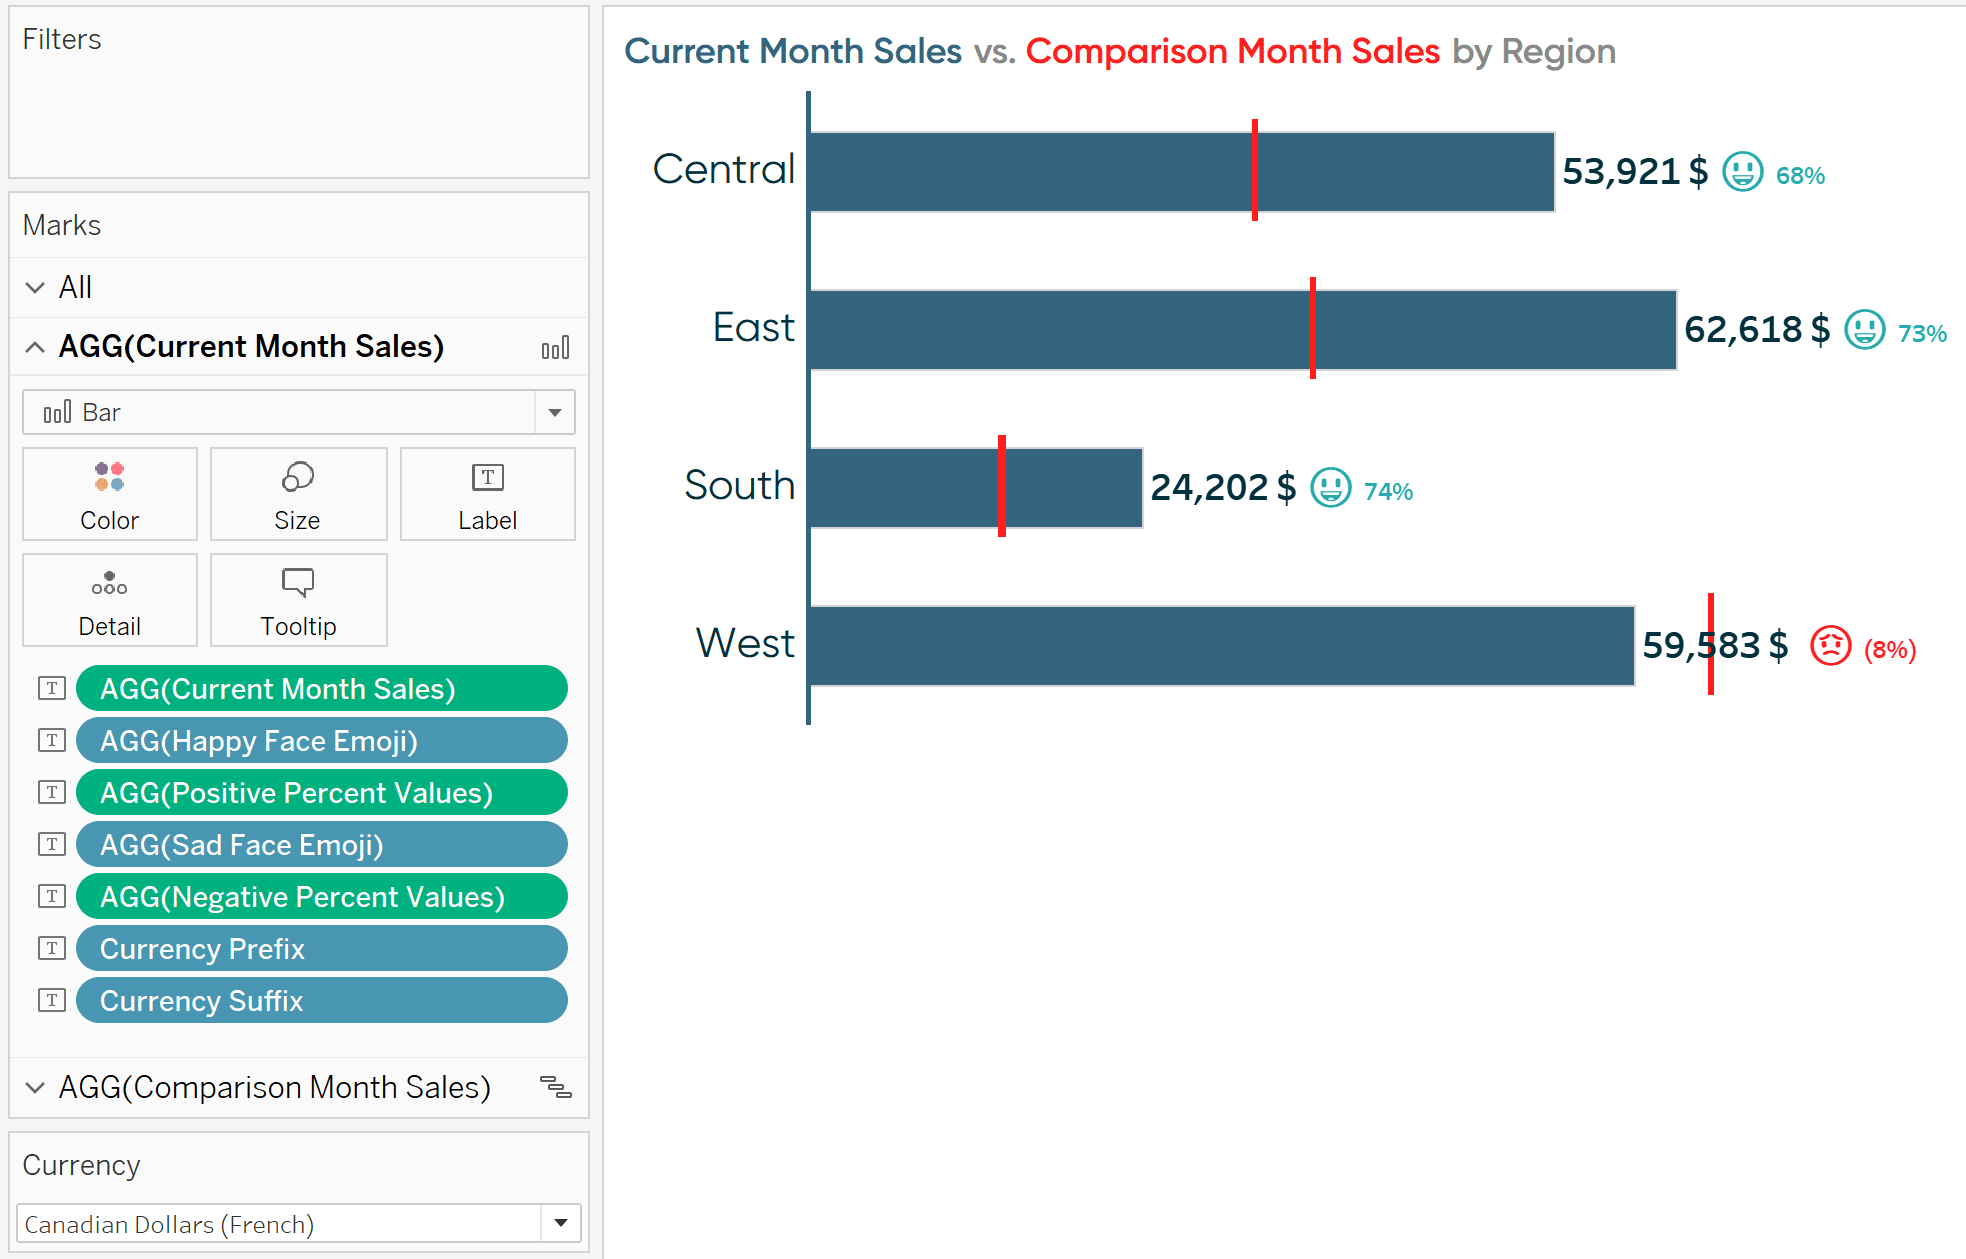
If I choose Canadian Dollars (French), the $ sign moves to the suffix.
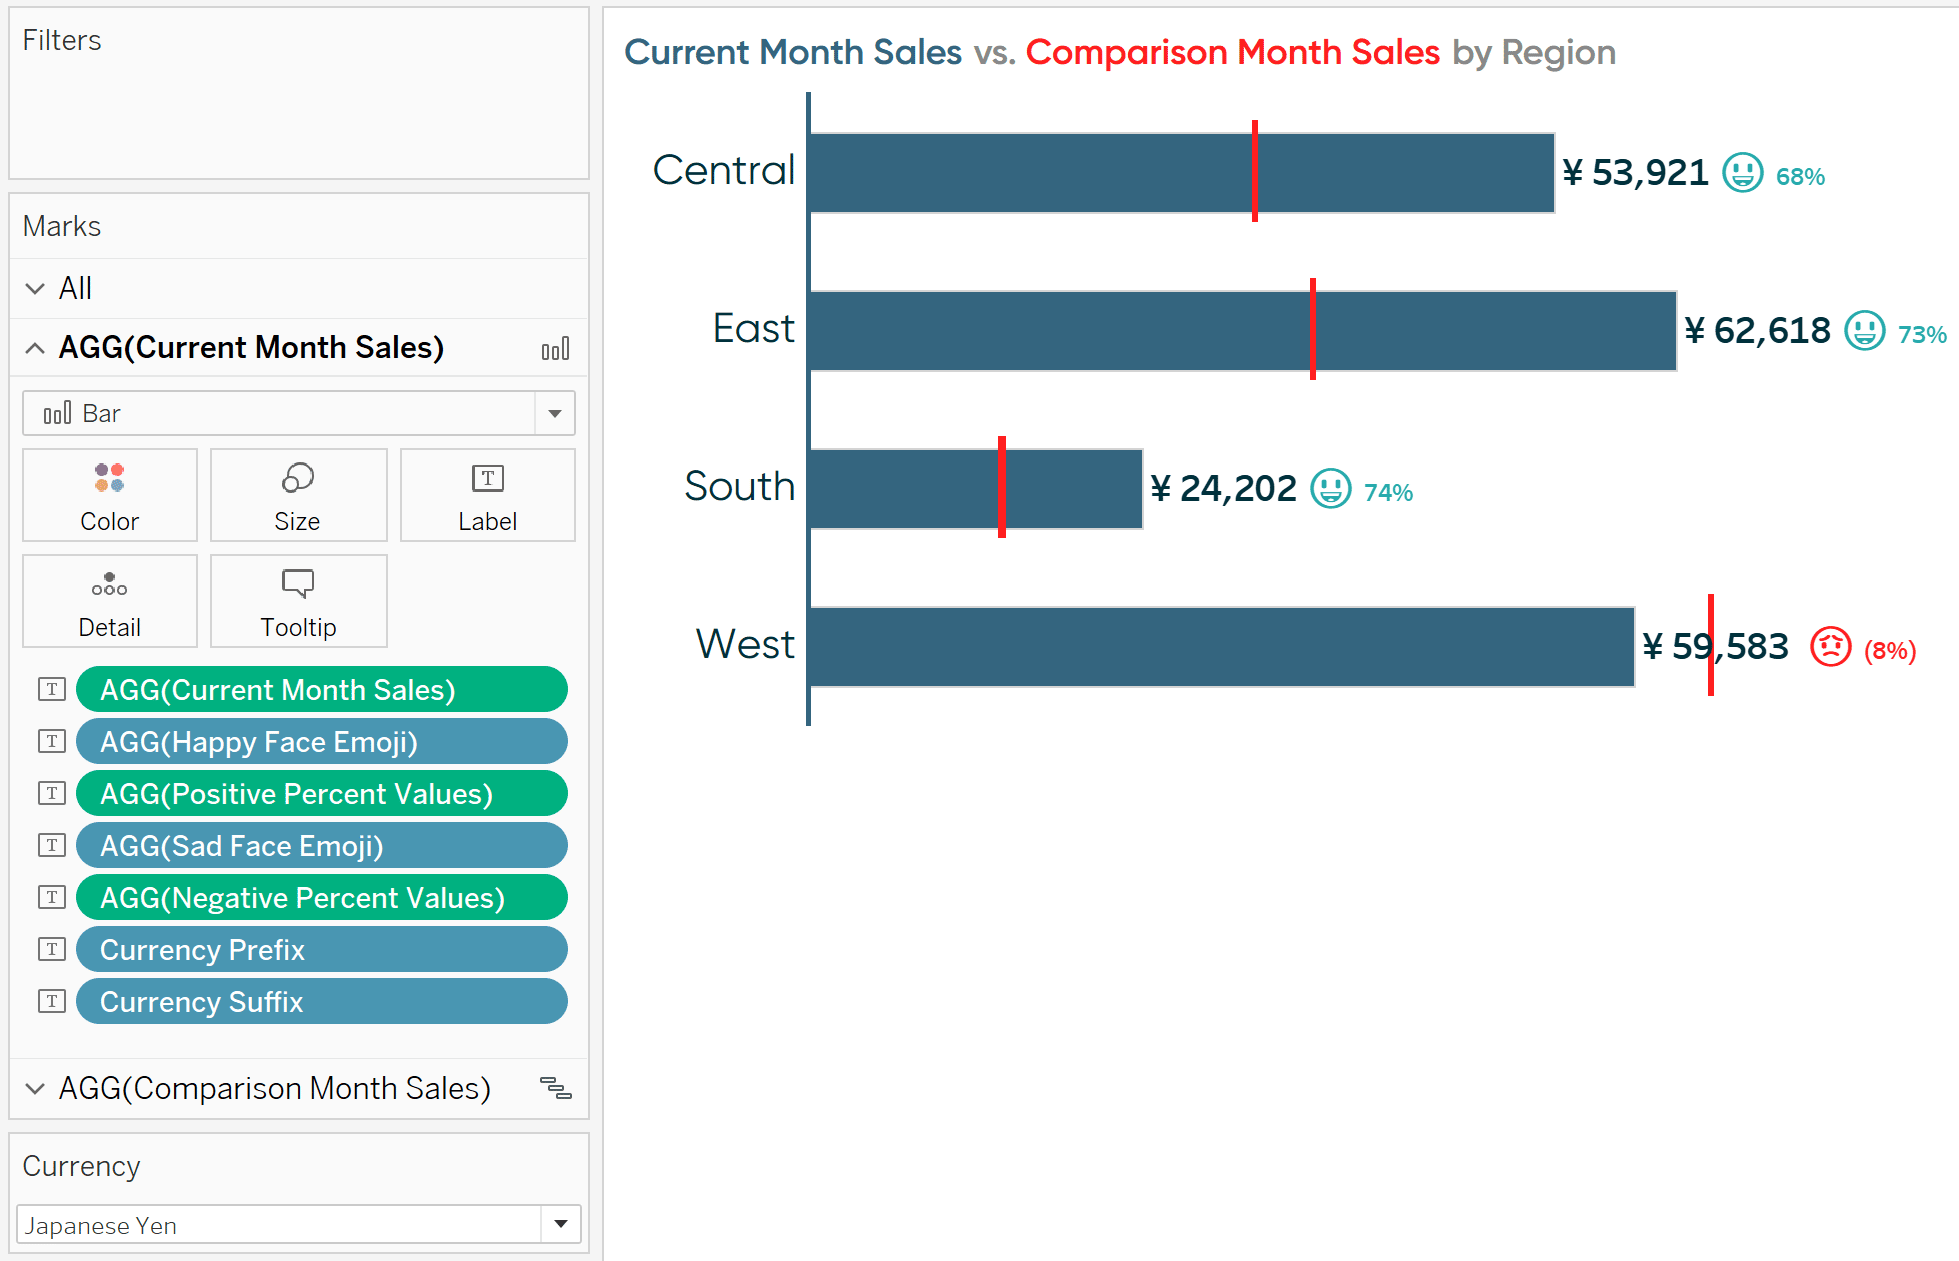
If I change the parameter value to Japanese Yen, the suffix goes away again and nosotros run into a ¥ sign every bit a prefix.
For more thoughts on currency conversion, read Solutions from Tableau Grooming: How to Deduplicate Joined Rows.
Thanks for reading,
– Ryan

How To Change Background Color With A Calculated Field In Tableau,
Source: https://playfairdata.com/3-ways-to-conditionally-format-numbers-in-tableau/
Posted by: matneyfror1958.blogspot.com
0 Response to "How To Change Background Color With A Calculated Field In Tableau"
Post a Comment